Rules SDK Usage Guide
Essential knowledge
Changed on:
1 Nov 2024
Overview
[Warning: empty required content area]Key points
[Warning: empty required content area]Prerequisites
Let's begin by installing the correct software onto your computer. This includes software required to install and run Rules SDK, also called Fluent SDK.Below you will find a list of software that you must install before moving on to the next lesson. Use the checkboxes to track your progress as you complete each installation step- Install JDK 8. Currently, Rules SDK (Fluent SDK) supports Java 8. You can download Java 8 from the Oracle link —> JDK 8 Installation. Once installed, verify that JDK 8 is active on your system path.
- Install Maven 3.6. We recommend to use Maven 3.6 which can be downloaded from Apache Maven —> Download Apache Maven. Once installed, verify that Maven is active on your system path.
- Install IntelliJ IDE. Use IntelliJ IDE (either CE or Ultimate edition).
- Install GraphQL Plugin. Install the GraphQL plugin for IntelliJ by using: IntelliJ > Preference > Plugins > search for GraphQL, and install it.
- Install Postman. You can install Postman from this link -> Download Postman.
Rules SDK Setup & Plugin Creation
Introduction to Rules SDK
In this lesson, you will learn about Rules SDK, the Software Development Kit for Fluent Order Management, and the key features of the SDK.What is the Rules SDK?
Rules SDK (also referred to as Fluent SDK) is the software development kit for the OMX Workflow Framework. It allows Java developers to build custom rules to extend the standard Rule Library as part of the OMX Workflow Framework. Rules SDK provides developers with the ability to:- • Build plugins containing custom-developed Rules for deployment into OMX Platform.
- • Easily install plugins on the OMX Platform for use in the client workflows.
- • Remain unique and competitive within their own market space.
- • Have control over the optimisation and processing of their omni-channel orchestrations.
Key Features of Rules SDK
- Ready to use Java Maven Archetype for creating a new Fluent Plugin Project.
- Easy to use Install Scripts for Windows, Linux, and Mac OS.
- Java API Clients for both Fluent REST and GraphQL API.
- Ready to execute Postman, Insomnia, and GraphiQL Scripts for both Fluent REST and GraphQL API.
- Sample Rules which are ready to deploy and run in a Workflow.
Rules SDK Installation Guide
Before you begin this lesson, make sure that you've installed the software covered in the Prerequisites Section. ❗️The Rules SDK installation will not proceed until all prerequisites are installed.Please also ensure that:- IntelliJ (Java IDE) has a JDK path set to 1.8 and Maven 3.6 is configured within IntelliJ.
- If you are using Maven version > 3.6, add a mirror (a dependency provided in the Prerequisites Section) in your Maven directory .m2 >repository > settings.xml
Step 1. Download and install Rules SDK
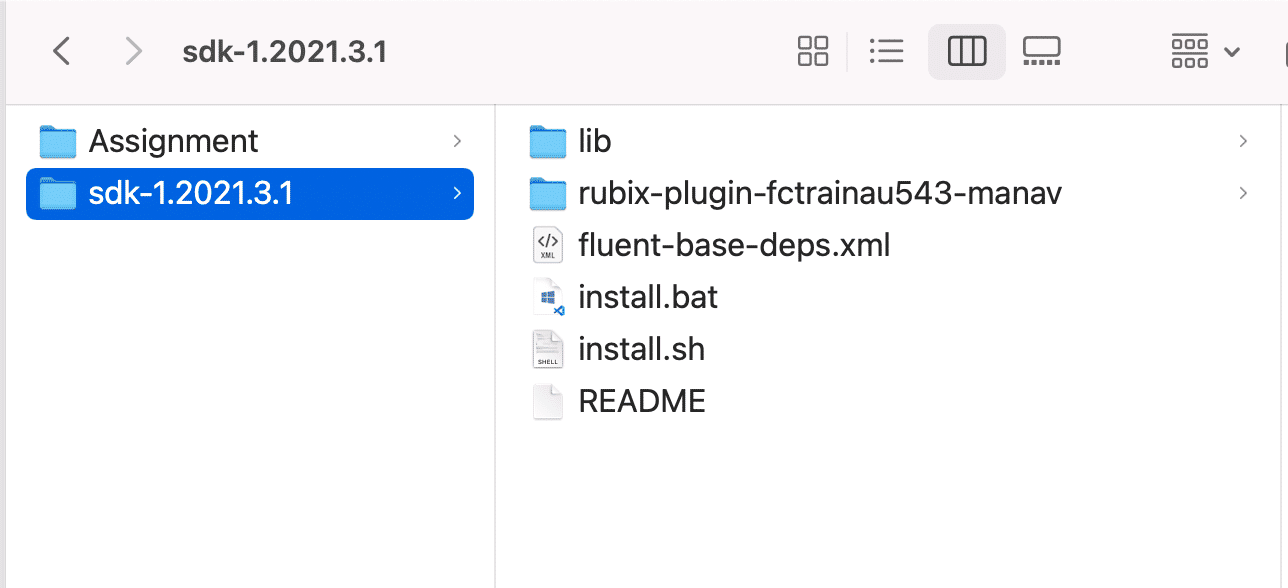
Download the Rules SDK from here - Download the Fluent SDK.Navigate to the downloaded folder and extract the zip file to a suitable project location on your system. You may wish to save it on the following project location based on your system:| Operating System | Project Location |
| Mac / Linux | ~/dev/fluent |
| Windows | C:\dev\fluent |
- Name and version of Rules SDK being downloaded. This folder contains lib folder, installation scripts and Readme file
- Installation Script based on your operating system
- For Mac/unix: Install.sh
- For Windows: Install.bat
- Readme File is the text file which provides the Installation and configuration steps
- Archetype jar file containing all the Archetype required for setting up a new project
- Foundation sources jar file containing all source code of all the rules that are being provided in an account. All the rules provided are part of Foundation Plugin
Step 2. Run the Installation Command
- Open up a Terminal / Command prompt and navigate to your extracted SDK folder.
- The installation script for your environment is in the SDK Folder. Refer to the table below — run the installation script for your specific environment (Mac/Linux or Windows):
| Operating System | Project Location |
| Mac / Linux | install.sh run the command: My-MacBook-Pro:~/dev/fluent me$ ./install.sh*Replace [the location ] with your extracted folder location |
| Windows | install.batrun the command: C:\dev\fluent > install.bat*Replace [the location] with your extracted folder location |
Step 3. Configure your Plugin Project
Configure the plugin project with the details from your sandbox account. You need to define the values for the following properties:- 'groupId'. This is your Maven group id. Typically made up of a reverse of your primary root domain e.g. com.acme
- 'artifactId'. This is a descriptive unique Maven Java module name in kebab case format (I.e. hyphens between each word in lower case). Follow the naming convention
`rubix-plugin-<fluentaccountId>-<pluginshortname>`. For training purposes, you may use your name as the <pluginShortName>. For e.g. rubix-plugin-training-manav
- 'fluentAccountId'. This is your Fluent Account ID. You can get the value from Postman.
- 'fluentApiHost': https://<fluentAccountId>.sandbox.api.fluentretail.com. This value is pre-populated with your sandbox url. Press Enter to accept the value
- 'fluentApiPassword'. This is your Fluent Account password. You can get the value from Postman.
- 'fluentApiPort' = 443'. This value is pre-populated for SSL. Press Enter to accept the value
- 'fluentApiUserName'. This is your Fluent Account Name. You can get the value from Postman.
- 'fluentApiClientSecret'. This is your Fluent Account Secret Key. You can get the value from Postman.
- 'fluentPluginName'. Use the same name you have used in your artifactid eg. manav
- 'fluentVendorName'. This is your company name. e.g. Training Ltd (opens in a new tab)
- Confirm your parameters by entering the letter Y. If you need to change any of the values , then enter the letter N followed by Enter key, and repeat the above steps.
View an example of a successful build
- This is the same extracted Rules SDK folder(discussed above ),from where you have run the installation script for your system.
- This is the installed and configured plugin rubix-plugim-fctrainau543- manav which is created as a result of successful build.
Video Demonstrating Steps 2 & 3
This video illustrates how to:✅ Structure of an extracted SDK Folder✅ How to run the Installation Script on a Mac System✅ How to configure the plugin project by providing values to the required properties.Plugin Structure & JS GraphQL
GraphQL within Plugin Project
In this module, you will learn about a Plugin Project structure and JS GraphQL within the Plugin Project. You will also learn how to modify and run a JS GraphQL query.Plugin Project Folder Structure
💡 Let's take a look at the project folder structure of the created plugin.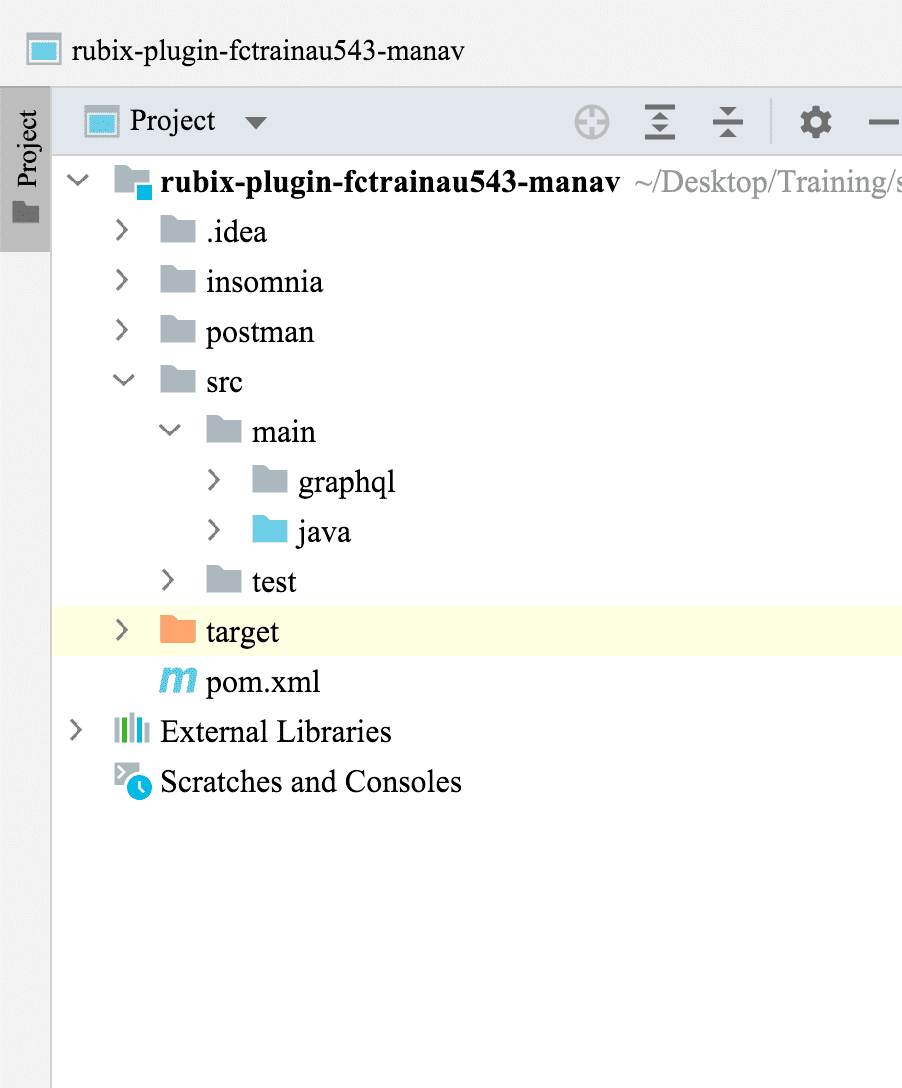
- insomnia - This folder contains all the required API Requests and workflows to set up a new retailer with sample data and workflows for each of the Fluent Apps.
- postman - The postman folder contains the current API Collection for setting up a retailer, and installing and running the sample plugin rules.
- src - This folder will contain all the java source code. You will write your custom Rules in this folder.
- graphql - This folder will contain all the queries and mutation . Java class are auto generated for each query and mutation.
- java - You will write the JUnit / unit test cases/classes in this folder.
- pom.xml - It is an XML file that contains information about the project and configuration details used by Maven to build the project. It contains default values for most projects.
GraphQL within IntelliJ
JS GraphQL plugin in IntelliJ IDE facilitate the generation of Java objects from your GraphQL queries. When you perform a maven build, such as an install or package, the JS GraphQL plugin will automatically generate a Java class based on the query. Make sure you have installed JS GraphQL Plugin in the IntelliJ. Please check the installation requirement listed in the Prerequisites section.💡 Let's have a look at the GraphQL plugin within the Java IDE (IntelliJ).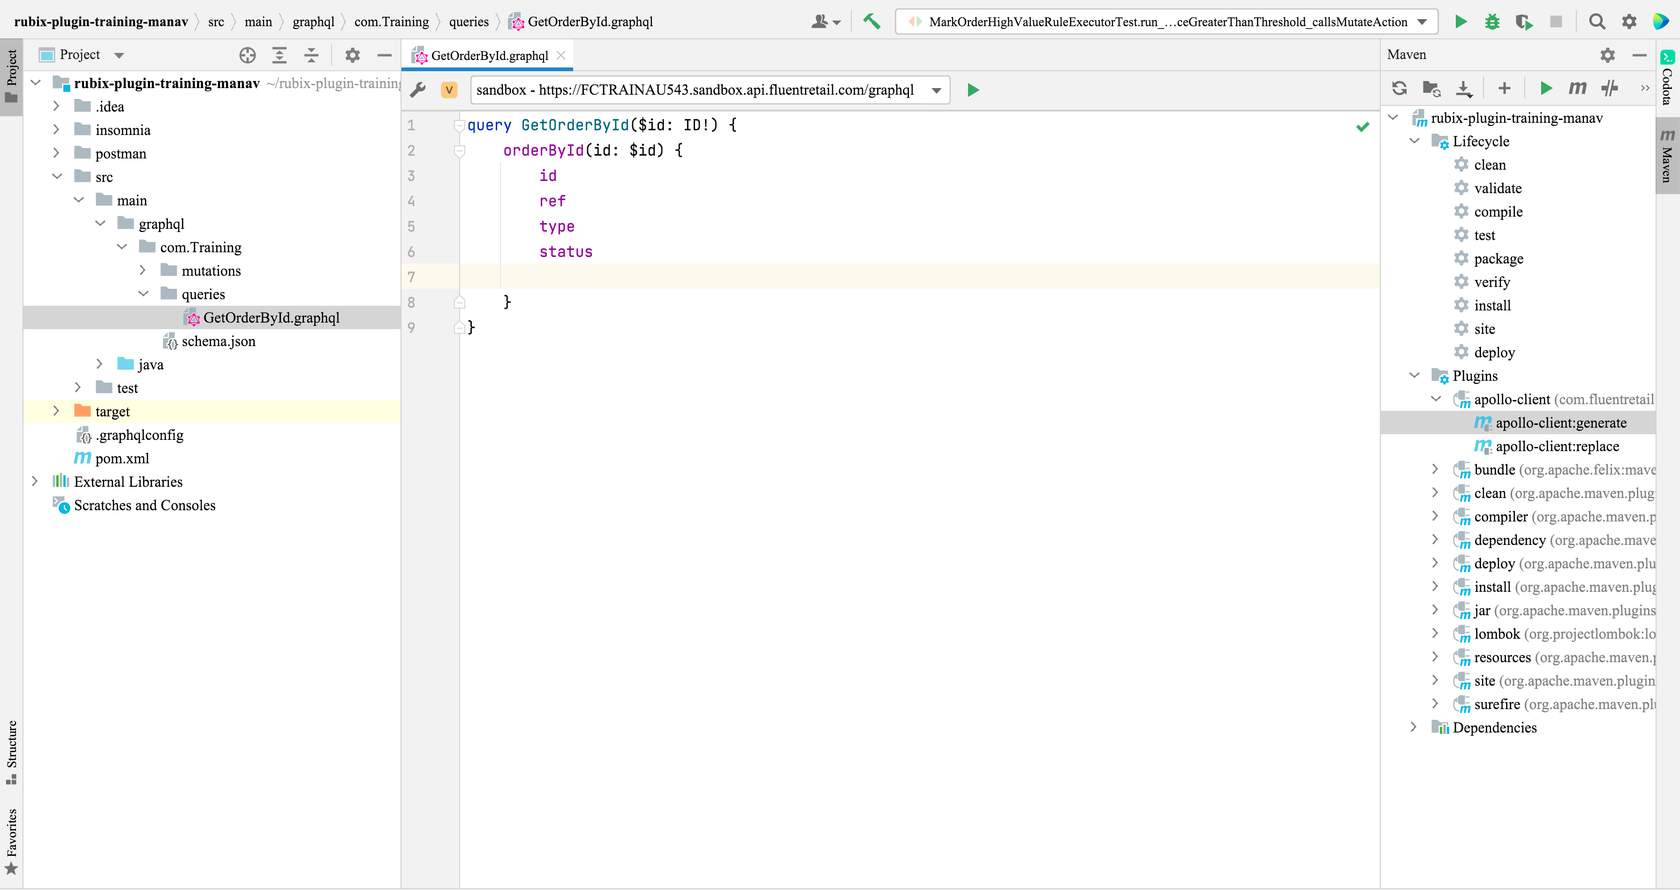
- graphql - This folder contains all the GraphQL queries and mutations.
- GetOrderById.graphql - This is an example GraphQL query which we will be using in our demonstrations later in the course.
- schema.json - This is the JSON version of Fluent's schema.
- apollo-client:generate - This plugin generates a Java class/code for the GraphQL queries/mutations written in the GraphQL folder.
Step 1. Create a GraphQLConfig file
💡 Let's configure GraphQL with a few of your Fluent Account settings. In order to create the GraphQLConfig file, right-click on [ your - plugin project - name ] > New > GraphQL configuration file. The GraphQLConfig file should now be created inside the root project folder next to pom.xml file. If the GraphQL configuration file option is not available — check that you have installed the JS GraphQL plugin.Step 2. Replace the code in the graphqlconfig file with the code below
Copy the code below and replace it with the code in the graphqlconfig file. You will need field values (e.g. Project Name, URL, SchemaPath) to configure the file.1{
2"projects": {
3"<YOUR_PROJECT_NAME>": {
4"schemaPath": "src/main/graphql/<YOUR_PROJECT_GROUP_PATH>/schema.json",
5"extensions": {
6"endpoints": {
7"sandbox": {
8"url": "https://<YOUR_FLUENT_ACCOUNT_ID>.sandbox.api.fluentretail.com/graphql",
9"headers": {
10"Authorization": "Bearer ${env:AUTH_TOKEN_ENV}"
11}
12}
13}
14}
15}
16}
17}Step 3. Fill the placeholders with your Fluent Account values in your graphqlconfig file
The graphqlconfig file has placeholders containing default values that must be replaced with values obtained from your Fluent Account.Check the following table for placeholder values to be inserted:| Placeholder | Values to be inserted |
| <YOUR_PROJECT_NAME> | Use your Fluent Account ID e.g. FCTRAINAU543 |
| src/main/graphql/<YOUR_PROJECT_GROUP_PATH>/schema.json | Use the path to the folder which contains the Schema.json file. For our example we will use com.training as it has Schema.json |
| https://<YOUR_FLUENT_ACCOUNT_ID>.sandbox.api.fluentretail.com/graphql | Use your Fluent Account ID e.g. FCTRAINAU543 |
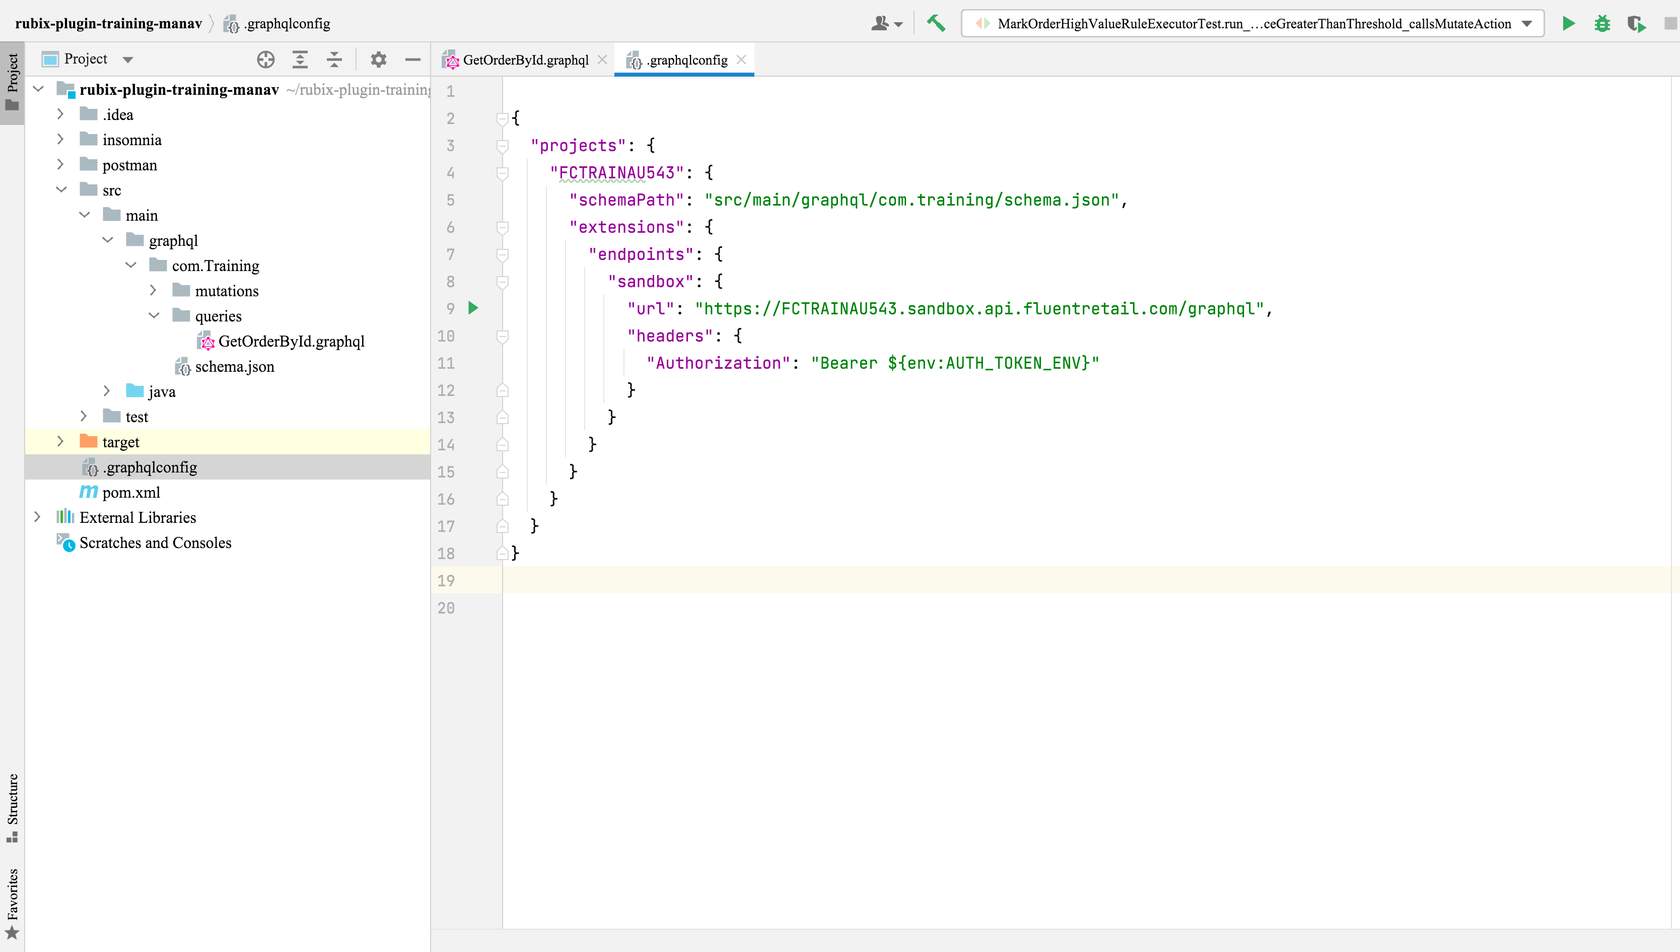
- grahqlConfig - This is the generated graphqlConfig file
- <YOUR_PROJECT_NAME>- This is your project name. Add a short unique Project name, mostly your accountID for eg "FCTRAINAU543"
- <YOUR_PROJECT_GROUP_PATH> - This is the path of the schema.json file in your project. In our plugin project, schema.json is under com. training folder so this <YOUR_PROJECT_GROUP_PATH> value is replaced with "com. training" so it will be "src/main/graphql/com.training/schema.json"
- url - You should replace < Your_Fluent_Account_ID> with your accountID . For eg "https://FCTRAINAU543.sandbox.api.fluentretail.com/graphql"
- Authoriszation - This is an environment variable. It is an authorisation token generated after an account is authorised in Postman. This value is filled at the run time.
Video Demonstrating Steps 1 to 3
This video illustrates how to:✅ Create a GraphQLConfig file✅ Replace the content of generated GraphQLConfig file with the Fluent code✅ How to fill the placeholders with your Fluent Account valuesModify and run a GraphQL query
So far, you've created and validated the graphqlconfig file for your Plugin Project. Now we will complete the steps (steps 1 to 3 below) to run a GraphQL query and generate a Java class from Apollo framework.Step 1. Modify Query
You can define a GraphQL query that can be used in a Rule. For example, if a Rule needs to evaluate an Order's total price, the Rule needs to retrieve this field via a GraphQL query. In this step, you will modify the existing GraphQL GetOrderById query:- In your plugin project's src/main/graphql/com.training/queries folder, open the "GetOrderById.graphql" file. Add the total price field to the query as per the query given below.
1query GetOrderById($id: ID!) {
2    orderById(id: $id) {
3        id
4        ref
5        type
6        status
7        totalPrice
8        attributes {
9          name
10          type
11          value
12        }
13    }
14}Step 2. Run the Query
⚠️ You can create new GraphQL queries or mutations in your plugin project's src/main/graphql/com.training/ (under mutation/queries subfolder)Follow the instructions below to run the query. Upon completing the steps, you should see the GetOrderById query data including the Order's total price in the query result window.- Fill the AUTH_TOKEN_ENV environment variable: AUTH_TOKEN_ENV is the environment variable that gets the value of access_token, which you get after authentication of the retailer from POSTMAN collection.
- Enter any valid order ID (Note: the query needs this ID as a variable) and run the query.
Step 3. Generate the Java class using the Apollo GraphQL plugin for IntelliJ
Perform a Maven build to let the Apollo GraphQL maven plugin generate a Java class based on the above query.👁🗨 Video Demonstrating Steps 1 to 3
This video illustrates how to:✅ Create and run a query✅ Generate the GraphQL classesIntroduction to Fluent Rules
Prerequisite Knowledge
First, let's get you familiarised with OMX Workflow and the Workflow Framework.- OMX Workflow - Understand the Workflow Engine (previously 'Rubix Orchestration Engine'), Workflow Design Patterns, Workflow Builder
- Workflow Framework - Understand the Workflow Framework, Events, and Triggers.
Rule Interface and Actions
Workflow Framework Rules are written using Java and contain a specific structure and metadata for describing and validating the Rule. In this lesson, you will learn how to write Rules by adding customised business logic.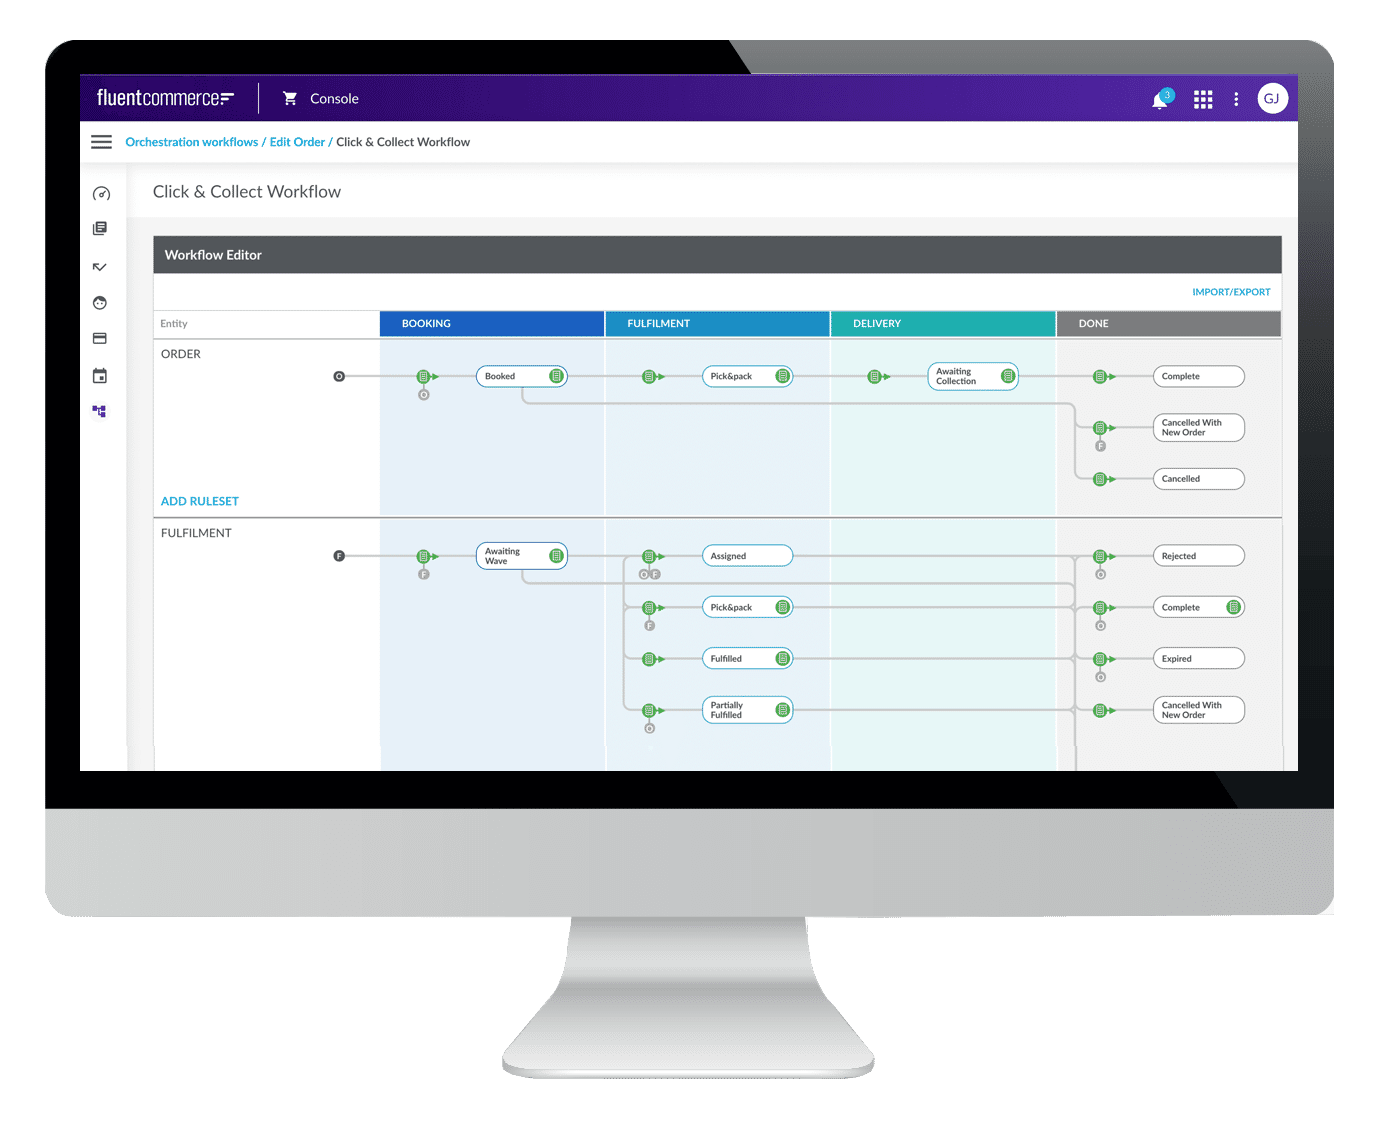
Basic steps to create a Rule Class
Rules, which are written in Java, contain specific structure and metadata for describing and validating the Rule. The steps below should be used to write a Rule:- Write a Java class that implements the com.fluentretail.rubix.v2.rule.Rule Interface.
- Implement the 'run' method which receives the current event context as a parameter.
- Define the Rule metadata via the @RuleInfo annotation .
- Define additional Rule metadata via the @EventAttributes and @Param* annotations.
Rule Interface and Actions for Rules
Rule Interface
For a Java class to be defined, as a Rule, it must implement the com.fluentretail.rubix.v2.rule.Rule interface which defines a class as a Rubix compatible executable Rule. The com.fluentretail.rubix.v2.rule.Rule provides access to the GraphQL API Client.The Rule interface declares a run method that takes in a Context. To learn more read Rule Development Guidelines & Recommended Practices and the Write your first custom Rule using the Fluent Rules SDK (Hello World) guide.Context parameter provides access to :
- Orchestrateable Entity e.g. context.getEntity()
- API Client e.g. context.api()
- Source Event e.g. context.getEvent()
- Rule Parameters e.g. context.getProp()
Available Actions for Rules
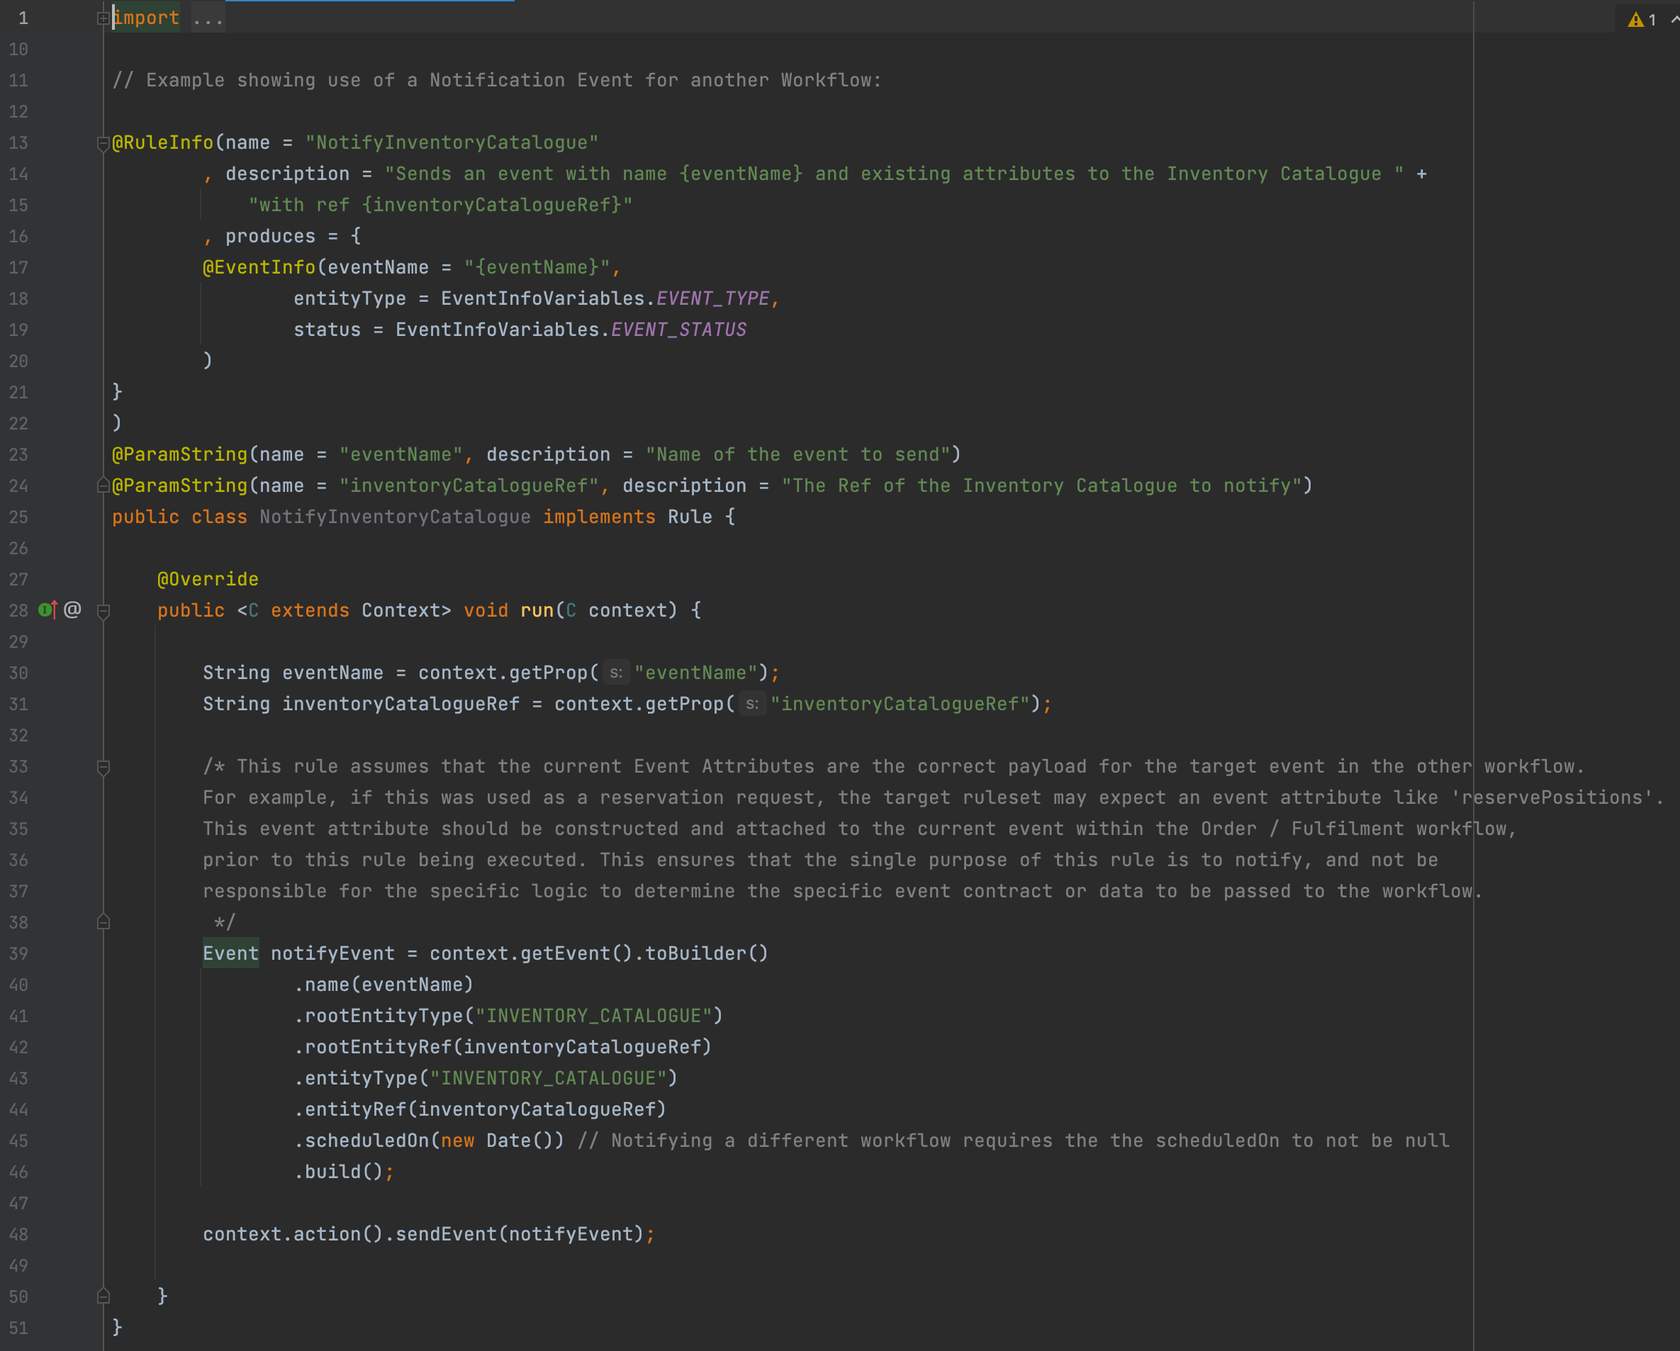
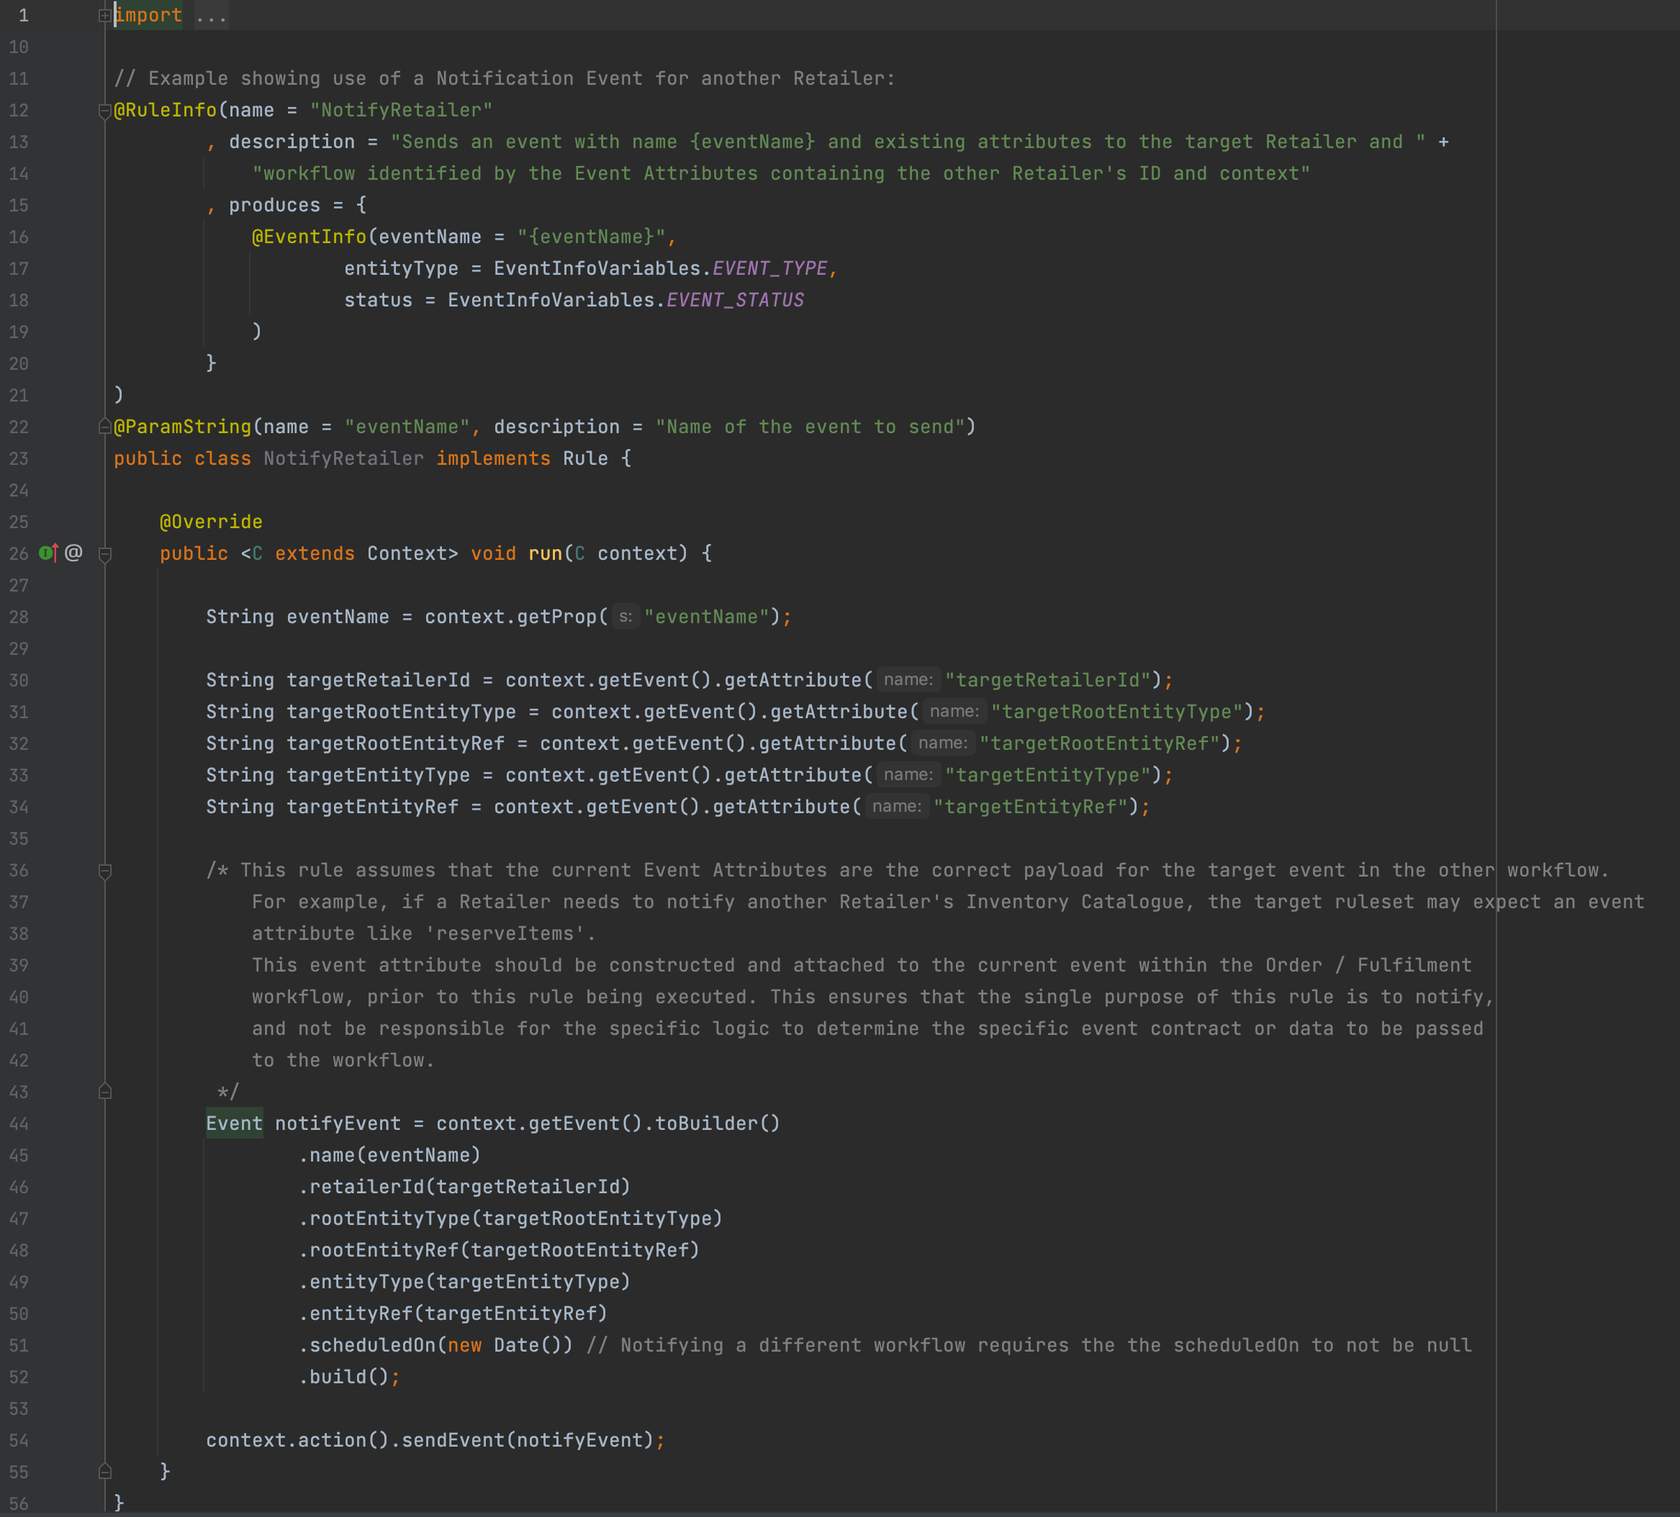
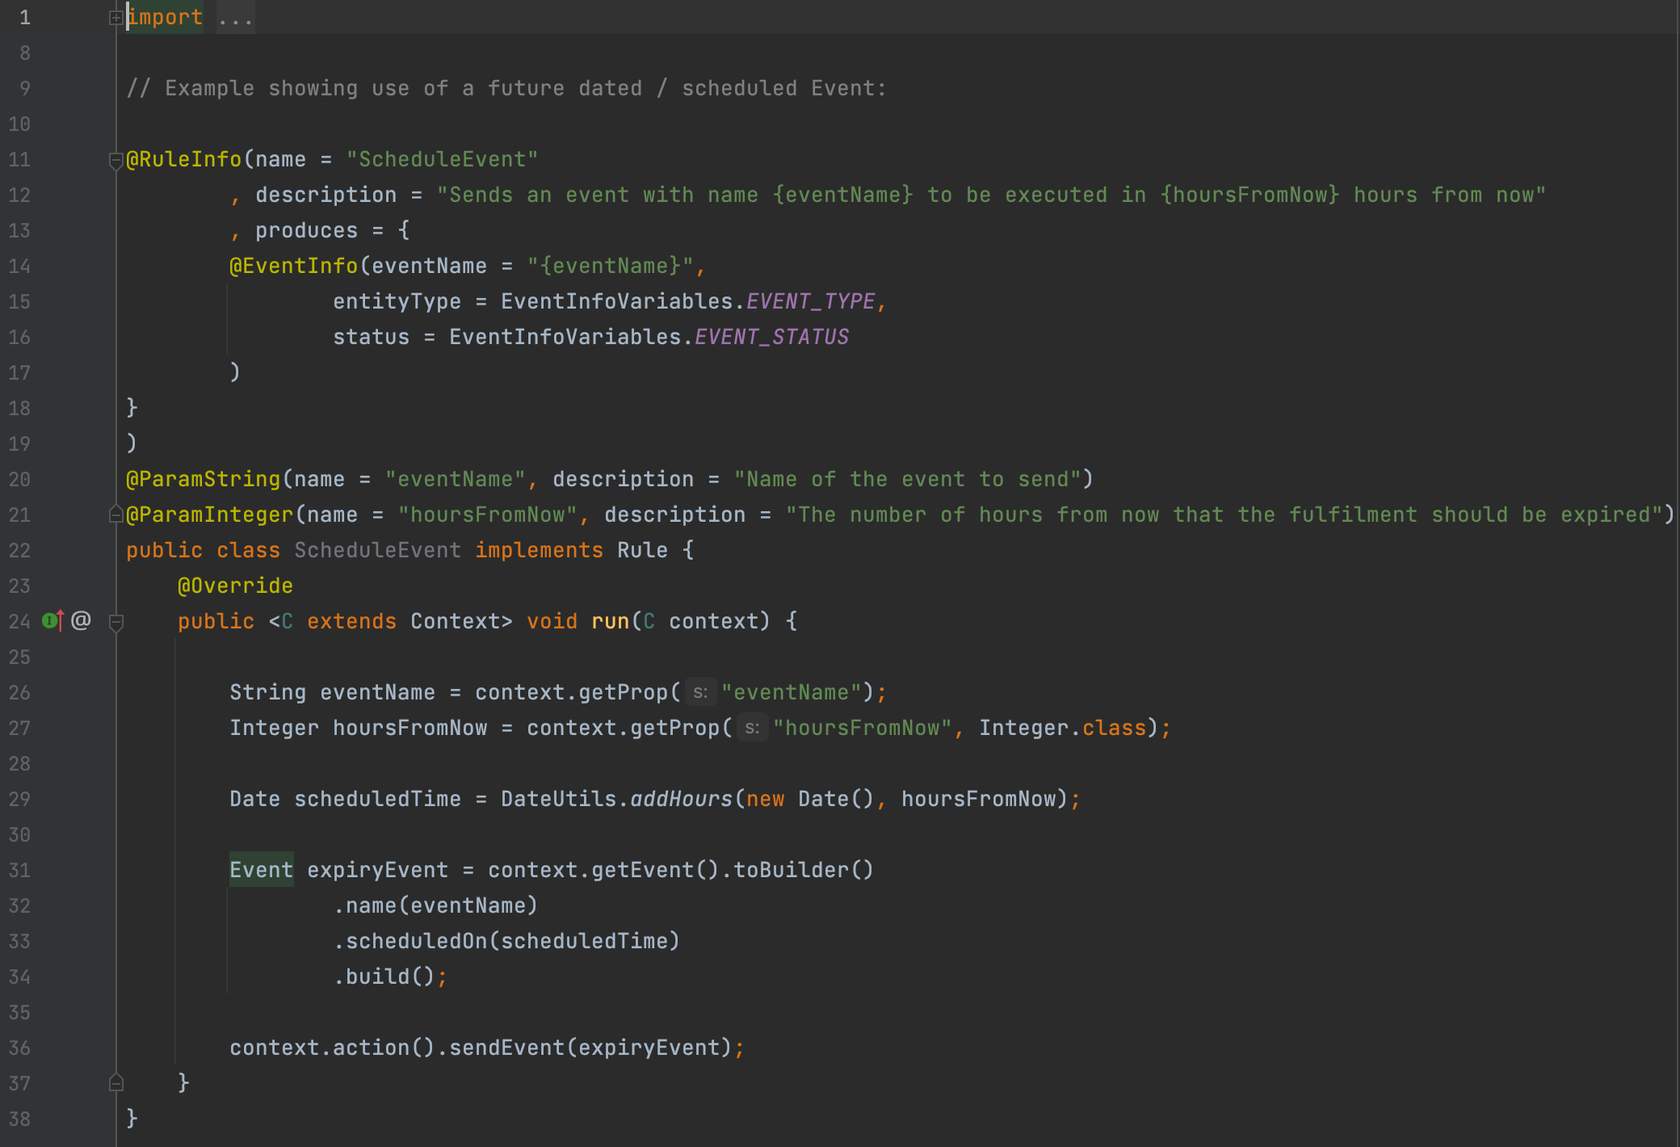
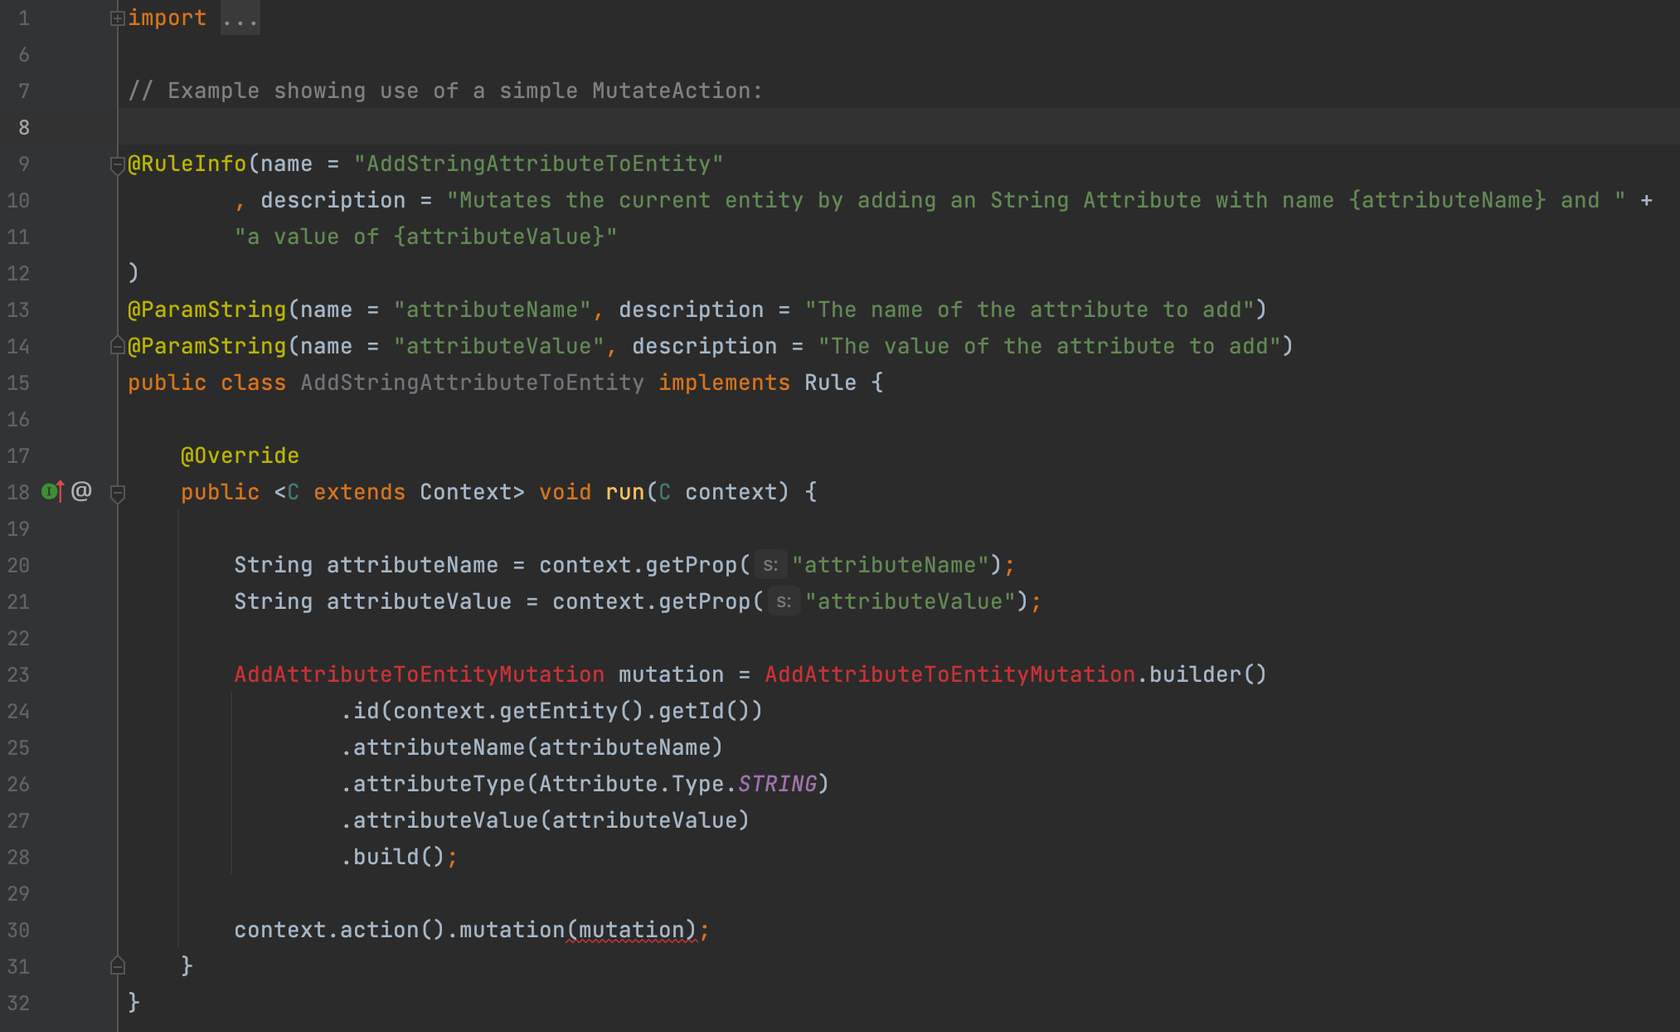
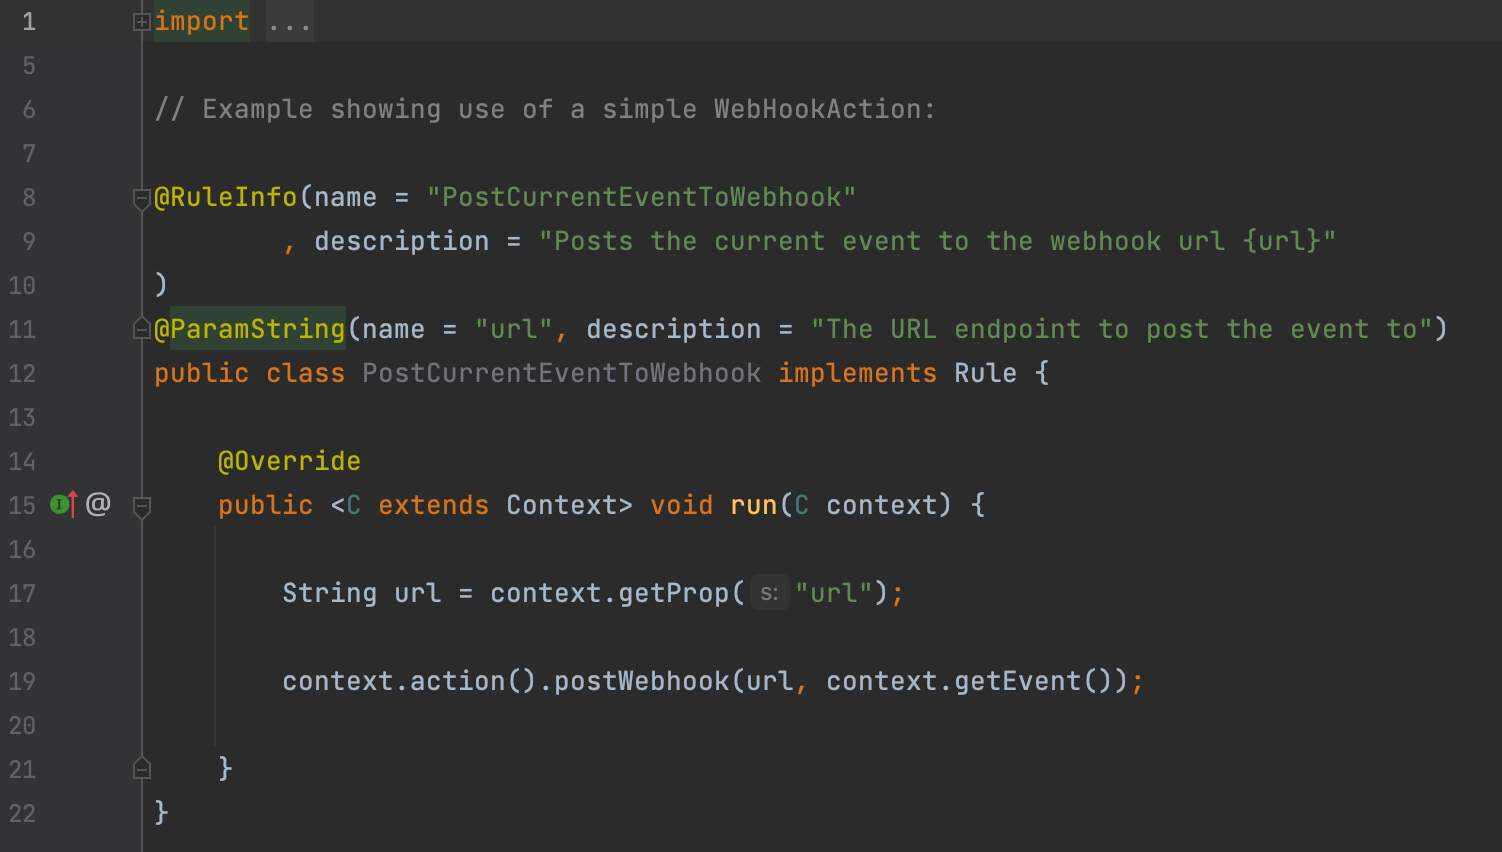
Rules have Actions as an output. These Actions are provided by the Rubix SDK, and handled in a very specific way by the Workflow engine. Actions are not immediately executed synchronously within the Rule's run method. They are simply queued, and executed at the end of the execution context.context.action().<ActionName> method returns the ActionFactory which provides the supported output actions for a rule.There are four possible Actions available to your Rules, examples for each Action are provided in the next section:- SendEventAction: SendEventAction produces an event, however that event could be for flow control, notification of other workflows, or future-dated events.
- WebhookAction: provides an integration ability, whereby data can be sent to an external endpoint.
- MutateAction: provides an action that mutates data (create or update an entity) within the Fluent Platform
- LogAction: provides the ability to add a custom Orchestration Audit Event
Examples of Rule Actions
Flow control
Notify another workflow
Notify another retailer
Future-dated/Scheduled
Mutate action
Webhook action
Log action
 To learn more read Rule Actions, Designing Rules, and Event Context.
Rule Annotations
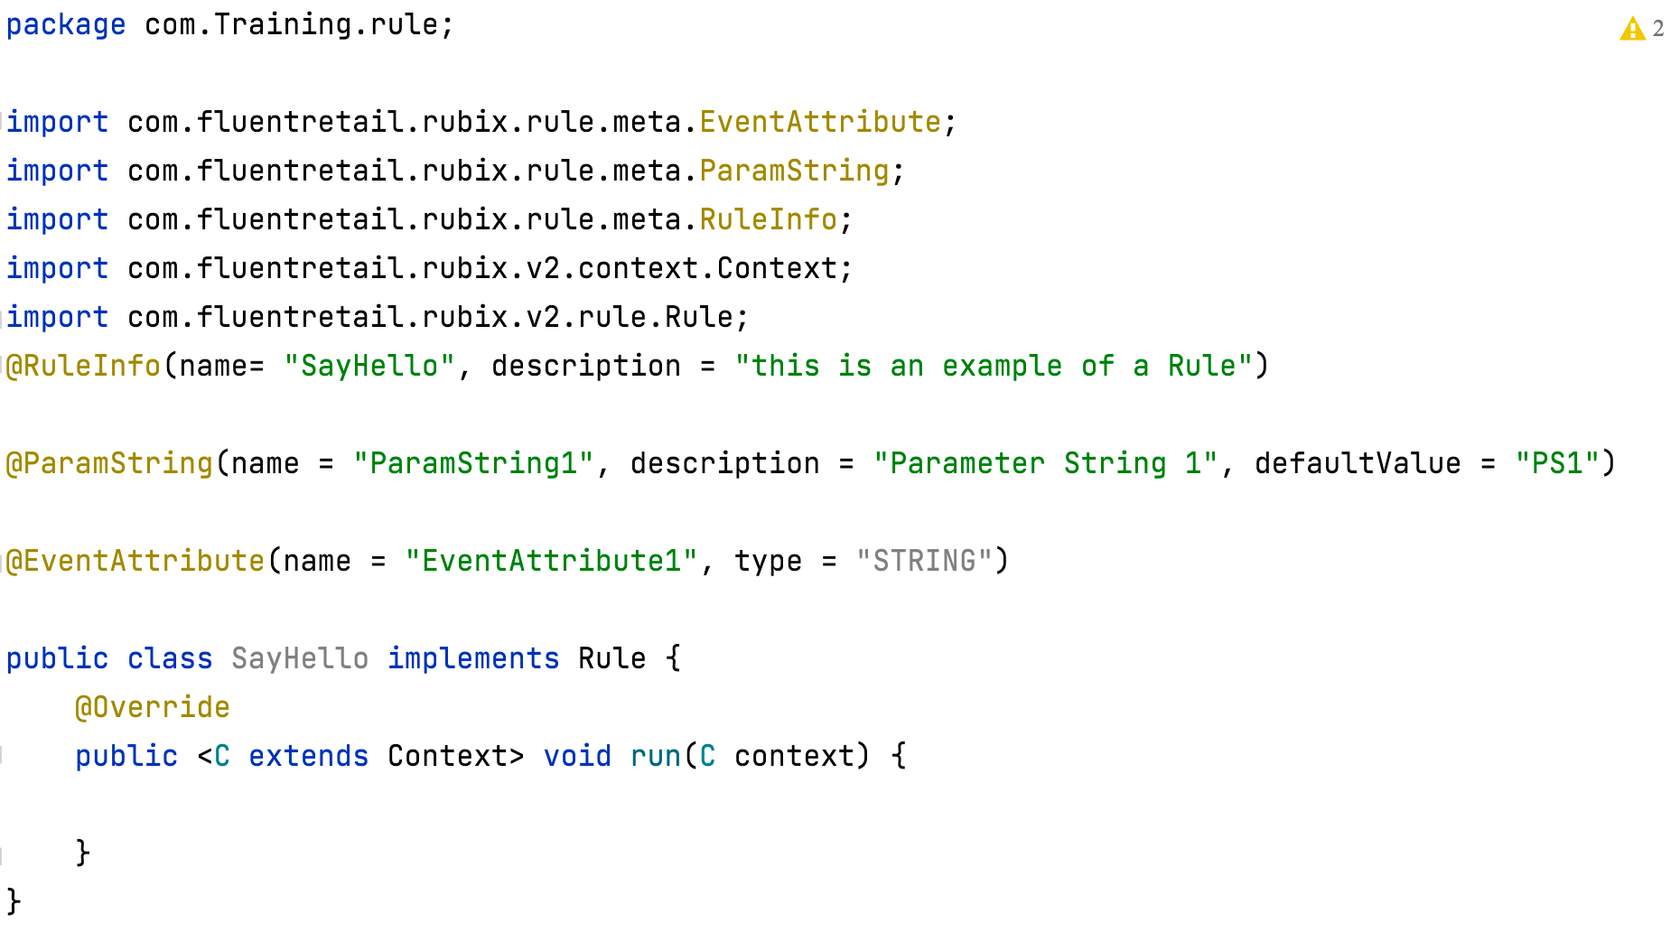
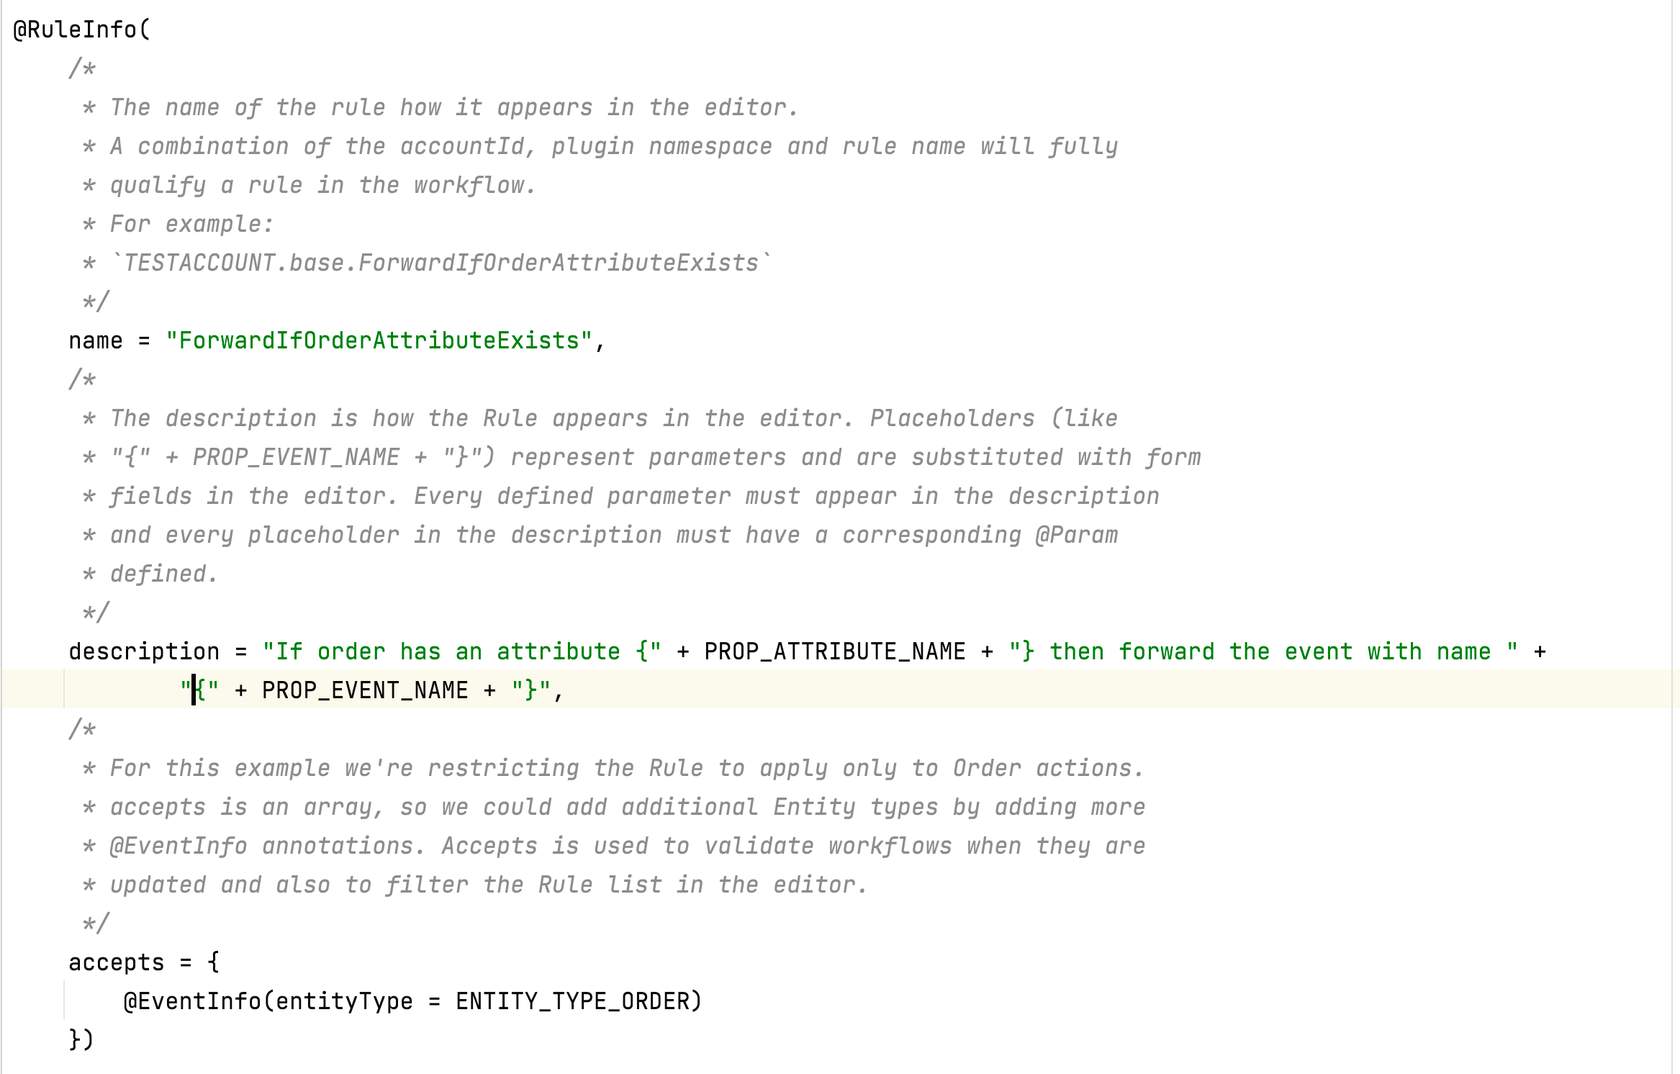
In this lesson, you will learn about Rule Annotations and different types of Annotations.Annotations are used to provide additional information. It can be viewed as a tag that represents metadata like Rule class details, params, event attributes, etc.RuleInfo Annotation
Describes the metadata for the Rule. It is important to annotate the Rule as accurately as possible.The information in the Rule Info is used in the following ways:- To validate the Rule for Workflow Execution.
- To provide data to display in the Workflow Builder and Rule Library.
- name - this is the Rule name.
- description - this is a parameterised string used to describe the behaviour of the Rule, as well as indicate what and how the Rule Parameters are used.
- accepts - this is a list of EventInfo Annotations to describe the acceptable entity types
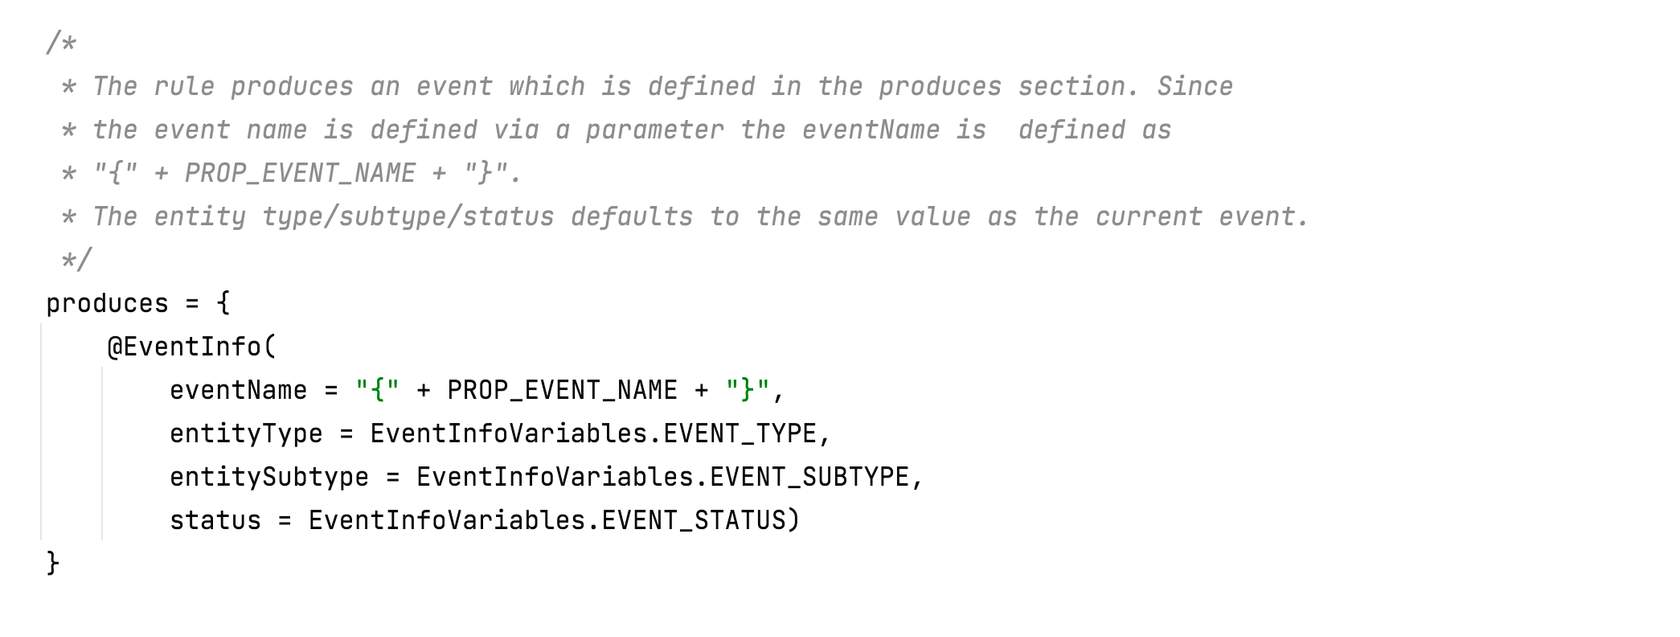
- produces - this uses an EventInfo Annotation to describe the Event that the rule outputs
- exceptions - this is a list of RuleExecutionException classes that this rule might throw( Exception Management)
EventInfo Annotation
The EventInfo Annotation describes the Event-specific metadata applicable to either the incoming event (Rule Info accepts property) or the outgoing action event (Rule Info produces property).The Event Info includes the following properties:- eventName - the Name of the Event produced by this Rule.
- entityType - the Entity Type of the Events accepted by this Rule, or the Entity Type of the Event produced by this Rule.
- entitySubType - the Sub Type of the Entity of the Event produced by this Rule.
- status - the Status of the Entity of the Event produced by this Rule.
Event Attributes and Rule Parameters
Declaring Event Attributes Required by the Rule:The Event Attribute type is used to provide configuration guidance to the Workflow, which is used to drive User Actions on the front end. When using a complex event attribute type such as a JSON object, it is helpful to provide a meaningful name for that type to the workflow configurators and frontend developers. Event Attributes are also considered "optional" in that the Rule should validate and handle it if they are not presentThe EventAttribute Annotation declares the Event Attributes the Rule requires from the Event.It contains 2 properties:- name - the Name of the Event Attribute.
- type - the Type of the Event Attribute.
- name - the Name of the Parameter. It is a required field
- description - the Description of the Parameters. It is a required field
- defaultValue - this is the Default Value of the Parameter. It is an Optional field
 💡 Let's see an example which illustrates annotations.
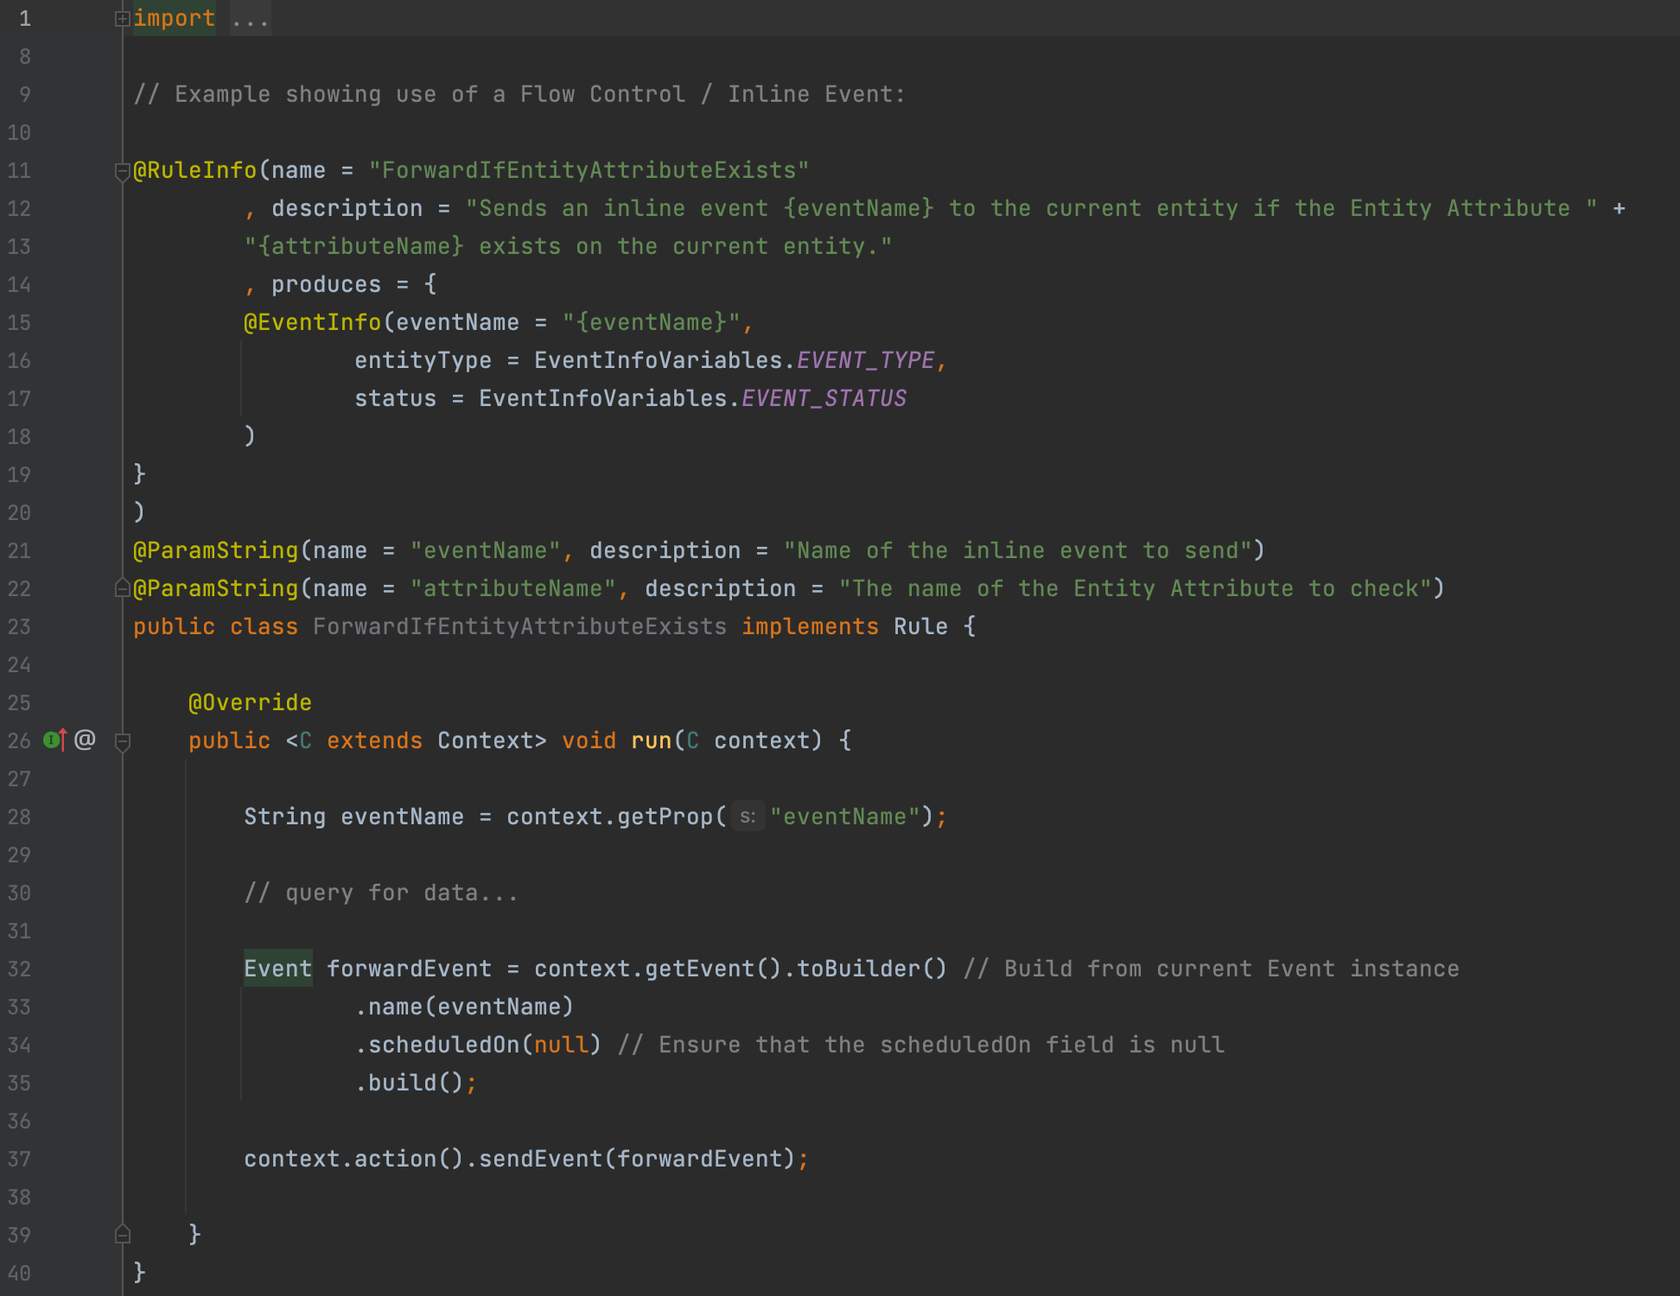
- Name - The name of the rule how it appears in the editor. *A combination of the accountId, plugin namespace and rule name will fully qualify a rule in the workflow. For example: TESTACCOUNT.base.ForwardIfOrderAttributeExists
- Description - The description is how the Rule appears in the editor. Placeholders (like *"{" + PROP_EVENT_NAME + "}") represent parameters and are substituted with form fields in the editor. Every defined parameter must appear in the description and every placeholder in the description must have a corresponding @Param defined.
- Accepts - For this example we're restricting the Rule to apply only to Order actions. Accepts is an array, so we could add additional Entity types by adding more. If we are not using accepts then it means the rule will work on any orchestrateable entity. @EventInfo annotations. Accepts is used to validate workflows when they are updated and also to filter the Rule list in the editor.
- Produces - The rule produces an event which is defined in the produces section. Since the event name is defined via a parameter the eventName is defined as "{" + PROP_EVENT_NAME + "}". The entity type/subtype/status defaults to the same value as the current event.
- Event attributes - The list of attributes which this rule expects to be present in the incoming event attributes. The event attribute annotations of all rules within a ruleset define the interface contract of the ruleset.
- ParamString - This annotation is used for Rule parameters. For example if the Rule takes 2 string parameters, one for attribute name and other for the outgoing event name. Parameterising allows the Rule to be re-usable in different ways.
- Slf4j - The @Slf4j annotation enables the logging which is currently visible only to Fluent SRE team, but in the future will be available to partners as well
Run Method
The run method is the entry point of the Rule. This is the method where you write the functionality of your Rule. It also provides an instance of the current context into the method to write your rule logic in there.Below you will find five stages (or phases) that we recommend for you to consider in your run method.
- Validation stage
- Retrieve data/query stage
- Write conditional logic stage
- Build action data stage
- Produce action stage
Below is an example of a run method configured with the required stages:
 To learn more read The run Method.
Case scenario - Implement Fraud Check
Client Scenario
- Our Client has experienced a high number of fraud cases in the past 6 months.
- In order to resolve the problem, our client has decided to implement fraud protection into their Order Fulfilment Workflow.
- Instead of manually verifying incoming orders, the client now wishes to implement an automated mechanism to check.
🔎 Requirements Analysis
Flag the Order as 'HIGH VALUE' when the Order's Total Price is greater than HighValueThreshold⚙️ Solution Design
Create a custom Rule in our Workflow with the following specifications:- Define a parameter for the Order Total Price Threshold: HighValueThreshold
- Add a Boolean Attribute to the Order named IS_HIGH_VALUE, and set it to TRUE if the Order's Total Price is above the value defined in the HighValueThreshold parameter.
- If the Order Total Price is less than (or equal to) the HighValueThreshold, then the rule will not do anything.
Designing your Rule
Most of the time, you will be thinking about the Rule in the context of a specific Workflow and Use Case. It is also important to think about your Rule design. Follow the basic design principles when designing your Rule:- 1 Be simplified
- 2 Be generic
- 3 Be flexible
- 4 Be re-usable
- 5 Be part of multiple compositions.
Writing the Rule
Create a Rule Class
In this module, you will learn how to create a Rule class in your Plugin Project and create a HighValueThreshold constant. You will also learn how to declare @RuleInfo and @ParamString Annotations to the Rule class.Remember this client?The steps below will use the Rule based on the Client Scenario — Implement Fraud Check.In Steps 1 to 3 below, you will learn to write a Rule based on the solution designed as per the Client's requirement (discussed in the previous section). You will use the (earlier created) plugin project created earlier in the course.Step 1. Create a Rule Class
- Using any Java IDE (we are using IntelliJ) open the Plugin Project created in the previous section.
- Create a new class named MarkOrderHighValueRule — Right-click on the src/main/java/com.training/rule folder of your plugin project to create a new java class. Name the class as MarkOrderHighValueRule
- Implement the v2 Rule Interface — Make your class 'MarkOrderHighValueRule', and implement Rule Interface com.fluentretail.rubix.v2.rule.Rule
- Override the run method and use the context in the run method. Please note, the v2 Rule interface is the one that supports GraphQL.
👁🗨 Video Demonstration for Step 1
This video illustrates:✅ How to create a Rule Class✅ Import com.fluentretail.rubix.v2.rule.Rule✅ How to pass the Context to run method.Step 2. Create a HighValueThreshold Constant (solution design specification)
To avoid magic Strings, declare your constants in the src/main/java.com/training/util folder. Define the HighValueThreshold parameter (required in the Solution design) in the util package by using the below code: public static final String PARAM_NAME_HIGH_VALUE_THRESHOLD = "highValueThreshold"Step 3. Add @RuleInfo and @ParamString annotations
Param parameters are inputs required to configure Rule in the ruleset. These parameters are set for every execution.Event-based parameters are optional and are Context-specific at run time.As per the Solution Design, we need to provide the data about the constant "highValueThreshold" to the Rule as below: @ParamInteger(name = Constants.PARAM_NAME_HIGH_VALUE_THRESHOLD, description = "The value threshold of which Orders should be marked as High Value")Use accepts property to list which Entity type is accepted by the rule. Some Rules can accept only some specific entities if we don't use accepts then Rule can accept any Orchestration entity.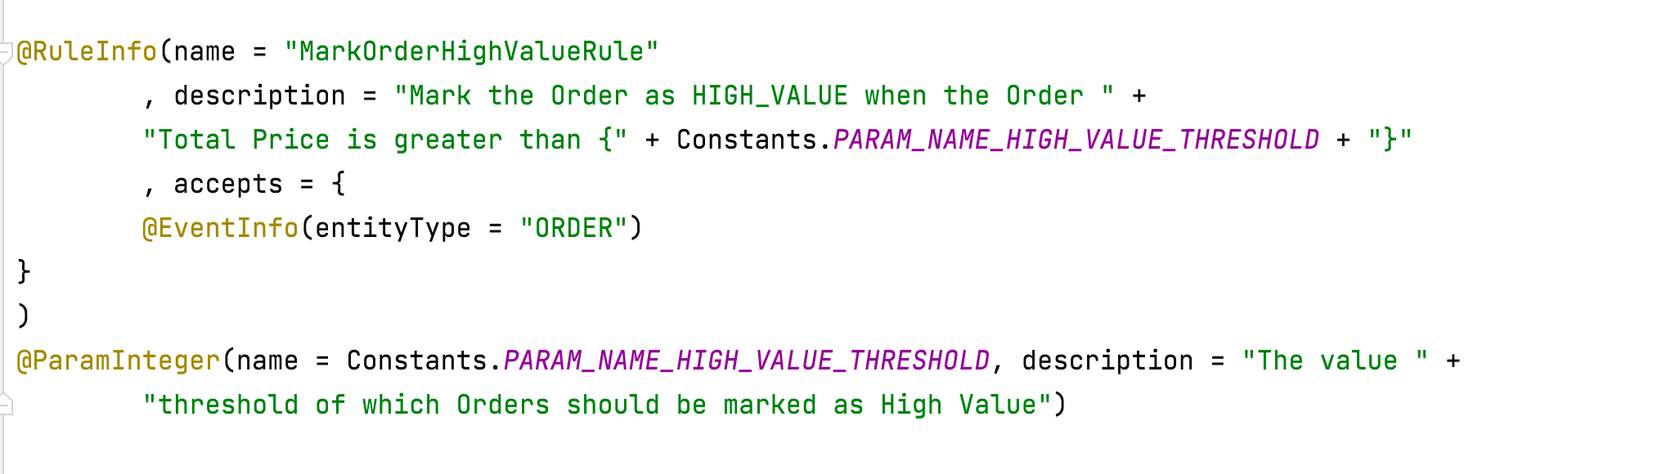
- RuleInfo: Name will include the name of the Rule class (which will be the class you have created)
- description in @RuleInfo: It is a brief description that what is rule doing and what parameters it is using
- accepts: In the case scenario , the Rule accepts only ORDER entity
- @ParamInteger: Shows the name, description and default value of parameter.
1package com.training.rule;
2
3import com.fluentretail.rubix.event.Event;
4import com.fluentretail.rubix.foundation.graphql.type.UpdateOrderInput;
5import com.fluentretail.rubix.rule.meta.EventInfo;
6import com.fluentretail.rubix.rule.meta.ParamInteger;
7import com.fluentretail.rubix.rule.meta.RuleInfo;
8import com.fluentretail.rubix.v2.context.Context;
9import com.fluentretail.rubix.v2.rule.Rule;
10import com.training.util.Constants;
11
12@RuleInfo(name = "MarkOrderHighValueRule"
13        , description = "Mark the Order as HIGH_VALUE when the Order " +
14        "Total Price is greater than {" + Constants.PARAM_NAME_HIGH_VALUE_THRESHOLD + "}"
15        , accepts = {
16        @EventInfo(entityType = "ORDER")
17                    }
18        )
19@ParamInteger(name = Constants.PARAM_NAME_HIGH_VALUE_THRESHOLD, description = "The value " +
20        "threshold of which Orders should be marked as High Value", defaultValue = 1000)
21
22
23public class MarkOrderHighValueRule implements Rule
24{
25    @Override
26    public <C extends Context> void run(C context)
27    {
28
29    }
30}👁🗨 Video Demonstration for Steps 2 & 3
This video illustrates how to:✅ Create a constant in util folder.✅ Use @RuleInfo annotation✅ Use @ParamString annotationConfigure the run method
In this lesson, you will learn how to configure the run method in the Rule ClassRemember this client?In this lesson, you will learn how to configure the run method in the MarkOrderHighValueRule class. You will write the five stages (phases) of the run method to get the desired solution, based on the Client Scenario — Implement Fraud Check covered in the previous lesson.Run method — Validation
The Validation stage (phase) lets you validate all the required inputs to the Rule. If parameters or attributes are not provided then you either fail early or exit early. If proper validation is not done then 'NullPointerException' or 'ClassCastException' occurs. If any required Validation fails, your Rule should exit immediately. To do this, you can either:- Use a return statement to exit immediately but continue processing the Ruleset, or
- Throw an Exception, and stop processing the Ruleset.
Steps to validate your Rule
Follow the steps below to validate your rule. Use the checkboxes to track your progress as you complete each step:You may also choose to watch the Video Demo below to see how each step is performed/executed.- context.getProp (Constants. CONSTANT NAME, TYPE.class) is used to get the local constant — save the retrieved constant in a variable.
- Validate the value retrieved and throw the exception if 'not valid' or 'null'.
Run method — Retrieve data/query
The Retrieve Data / Query stage (phase) is optional and is dependent on business needs. This stage helps you to get additional data that you need to execute your Rule. Please note that you will be using the query created in the 'GraphQL within Java IDE'Steps to execute your Rule
Follow the steps below to execute your rule. Use the checkboxes to track your progress as you complete each step:Reminder: You may also choose to watch the Video Demo below to see how each step is performed/executed.- Use context.getEvent().getEntityId() to retrieve the Order ID from the context
- In the pervious section "PLUGIN STRUCTURE & JS GRAPHQL" you have run a query "GetOrderByIdQuery " and have created a query Object . Now use GetOrderByIdQuery.builder().id(orderId).build( ) method to create an instance of the created "GetOrderByIdQuery "GraphQl Query Object.
- Execute the GraphQL Query using the GraphQL API Client provided by the context by using context.api().query()
- Create a method that validates the retrieved data by asserting it with expected data. The code snippet for this method is provided below.
- Call the above method in the run method to validate the retrieved data.
1 /*
2     * Query Result Validation Code extracted into Private method, but should be a Util method.
3     */
4    private void validateQueryResult(GetOrderByIdQuery.Data data, String orderId, Context context) {
5
6        if (data.orderById() == null) {
7            throw new RuleExecutionException(String.format("Unable to process Rule: %s - No Order Found for Id: %s, Order Ref: %s",this.getName(),orderId, context.getEntity().getRef()), context.getEvent());
8        }
9
10        if (data.orderById().totalPrice() == null) {
11            throw new RuleExecutionException(String.format("Unable to process Rule: %s - No TotalPrice Found for Order Id: %s, Order Ref: %s",this.getName(),orderId, context.getEntity().getRef()), context.getEvent());
12        }
13 }👁🗨 Video Demonstration — Steps 1 and 2
This video illustrates how to:✅ Include validation stage in the run method of the Rule class.✅ Include stage - Retrieve and validate retrieved in the run method of the Rule class.Run method — Write conditional logic
This phase performs any conditional logic required before building and producing action. Use a simple if statement to write condition logic.In the Client Scenario, the Rule's action is executed on the below condition: 'If totalPrice of the Order is greater than a threshold parameter' code snippet:1// Simple Logic:
2if (data.orderById().totalPrice() <= threshold) {
3return;
4}Run method — Build action data
The data needed for the action is prepared and action is built in this stage. A Rule will produce an output action like:- Mutation (update or save some new or changed data)
- SendEvent (send an event to trigger workflow)
- SendWebhook (send an event to an external system)
Steps to build an action
In the Client scenario, let's say we want to save a new attribute to the Order indicating the Order is 'High Value'. To do so we can do the following:- Define your GraphQL Mutation query in the src/main/graphql/mutations folder.
- Run a maven build to generate the Mutation Java Object.
1mutation updateOrderAttributes($input: UpdateOrderInput) {
2 updateOrder(input: $input) {
3     ref
4 }
5}- Add a constant to hold the Attribute key in the Constants class. i.e create a new boolean AttributeInput named IS_HIGH_VALUE with a value of TRUE.
- Write a method that creates and returns a List <AttributeInput>. This attribute list is passed to the instance of UpdateOrderInput.
1/*
2     * Extracted to private method, but should be a Util method.
3     */
4    private List<AttributeInput> createNewAttributeInputAsList(String attrName, Class type, Object attrValue) {
5
6        AttributeInput attrInput = AttributeInput.builder().name(attrName).type(type.getSimpleName().toUpperCase()).value(attrValue).build();
7        List<AttributeInput> attributeInputList = new ArrayList<>();
8        attributeInputList.add(attrInput);
9        return attributeInputList;
10 }- Build the mutation query Object in preparation for producing a Mutation Action as below:
1// Prepare for Action:
2        List<AttributeInput> attributeInputList = createNewAttributeInputAsList(IS_HIGH_VALUE_ORDER_ATTRIBUTE_NAME, Attribute.Type.BOOLEAN.getValueClass(), Boolean.TRUE);
3
4        UpdateOrderInput updateOrderInput =  UpdateOrderInput.builder()
5                                                                .id(orderId)
6                                                                .attributes(attributeInputList)
7                                                                .build();
8 UpdateOrderAttributesMutation updateOrderAttributesMutation = UpdateOrderAttributesMutation.builder().input(updateOrderInput).build();Run method — Produce action
The final stage of the run method is to produce the output action , action which you have built in the Build Action data. For our example , you can use context.action to produce action and mutate action by using the following code:`context.action().mutation(updateOrderAttributesMutation);`👁🗨 Video Demonstration — Steps 3 to 5
This video illustrates how to:✅ Write the stage - write conditional logic in the run method✅ Build the action data stage in the run method✅ Produce the required action in the run methodException Management, Debugging and Logging Events
The Workflow engine ensures that all exceptions thrown out of Rules are recorded within the Orchestration Audit Events. This is important for providing detailed information about what went wrong.In order to ensure that the Orchestration Audit Events contain as much useful information as possible, it is important to consider the Exception Strategy used by your Rules.Fluent's Platform Exception Handling
There are 2 different ways exceptions are handled by Rubix:- Special handling for exceptions of type RuleExecutionException
- Default handling for all other Exceptions
The RuleExecutionException Class
Rubix provides a special exception type called RuleExecutionException which provides special handling of exceptions , any RuleExecutionException, or subclass thereof, thrown from or bubbled up through a rule back into the Rubix Executor, will be handled as follows:- Rubix engine will stop the execution of the current Ruleset, but continue processing previously queued inline events
- Rubix will not process any queued actions
- Rubix will log the exception in an orchestration audit Event, without a stack trace
- Rubix will mark the Event as a success
- Rubix will return a successful response to the UI if the execution was triggered by a User Action
- Rubix will create and attempt to execute a Ruleset Exception Event
- The name of this new Ruleset Exception Event is the same as the Ruleset that threw the exception and the eventType is set to EXCEPTION
- The RuleExecutionEvent message and the cause throwable (if it exists), will be available as part of the Exception Event for use within your rules
Default handling for other Exceptions
Fluent Platform supports the default Exception handling and all exceptions thrown or bubbled through from Rules, the Workflow Engine will handle these as follows:- Rubix will stop the current execution
- Rubix will not process any queued actions
- Rubix will log the exception in an orchestration audit Event, including a stack trace
- Rubix will mark the Event as failed
- Rubix will return an error response to the UI if the execution was triggered by a User Action
- Rubix will not create and attempt to execute a Ruleset Exception Event
Types of Debugging
You can debug either locally using IDE debugging options or on the sandbox.IDE Debugging
You can use your IDE Debugging menu and can debug as per standard Java Practice while running rules in Unit Tests or with the TestExecutor.Fluent does not provide a Remote Debugging capability whereby you can step through the code running in the deployed environment but we do provide Debugging in Sandbox for how to troubleshoot issues in the deployed environment.IntelliJ Debugging menu and debug tool window are shown in the image below.
Sandbox Debugging
The primary mechanism for debugging on a deployed environment is activity tracking or Orchestration Audit Events. You can easily query these for any context via the Event API, or via the Admin Console.Recommended practices- Avoid Trial & Error debugging and testing
- Always try to reproduce the issue locally, either with Unit Tests or with the TestExecutor
- Use the Events (Activities) to see what happened during the execution
- Ensure your Rules are as atomic (small single-purpose) as possible - the more granular your rules, the more useful information will be provided by the Audit Events, making problem identification much simpler.
Logging & Audit Events
The Workflow Engine is designed to provide Audit Log Events during the execution of any workflow.This includes the following categories of Audit Events:- Snapshot - A snapshot of the Entity at the time the Orchestration Event is received into the workflow.
- Ruleset - An audit of the ruleset executed as a result of an Orchestration Event
- Rule - An audit of a Rule executed within a ruleset as a result of an Orchestration Event
- Action - An audit of an Action executed as a result of an output of a Rule
- Exception - An audit of an Exception that has occurred during the execution of an Orchestration Event
- Custom Logs (LogAction) - The context.action().log() can be used to log custom Orchestration Audit Events.
Custom Log Examples
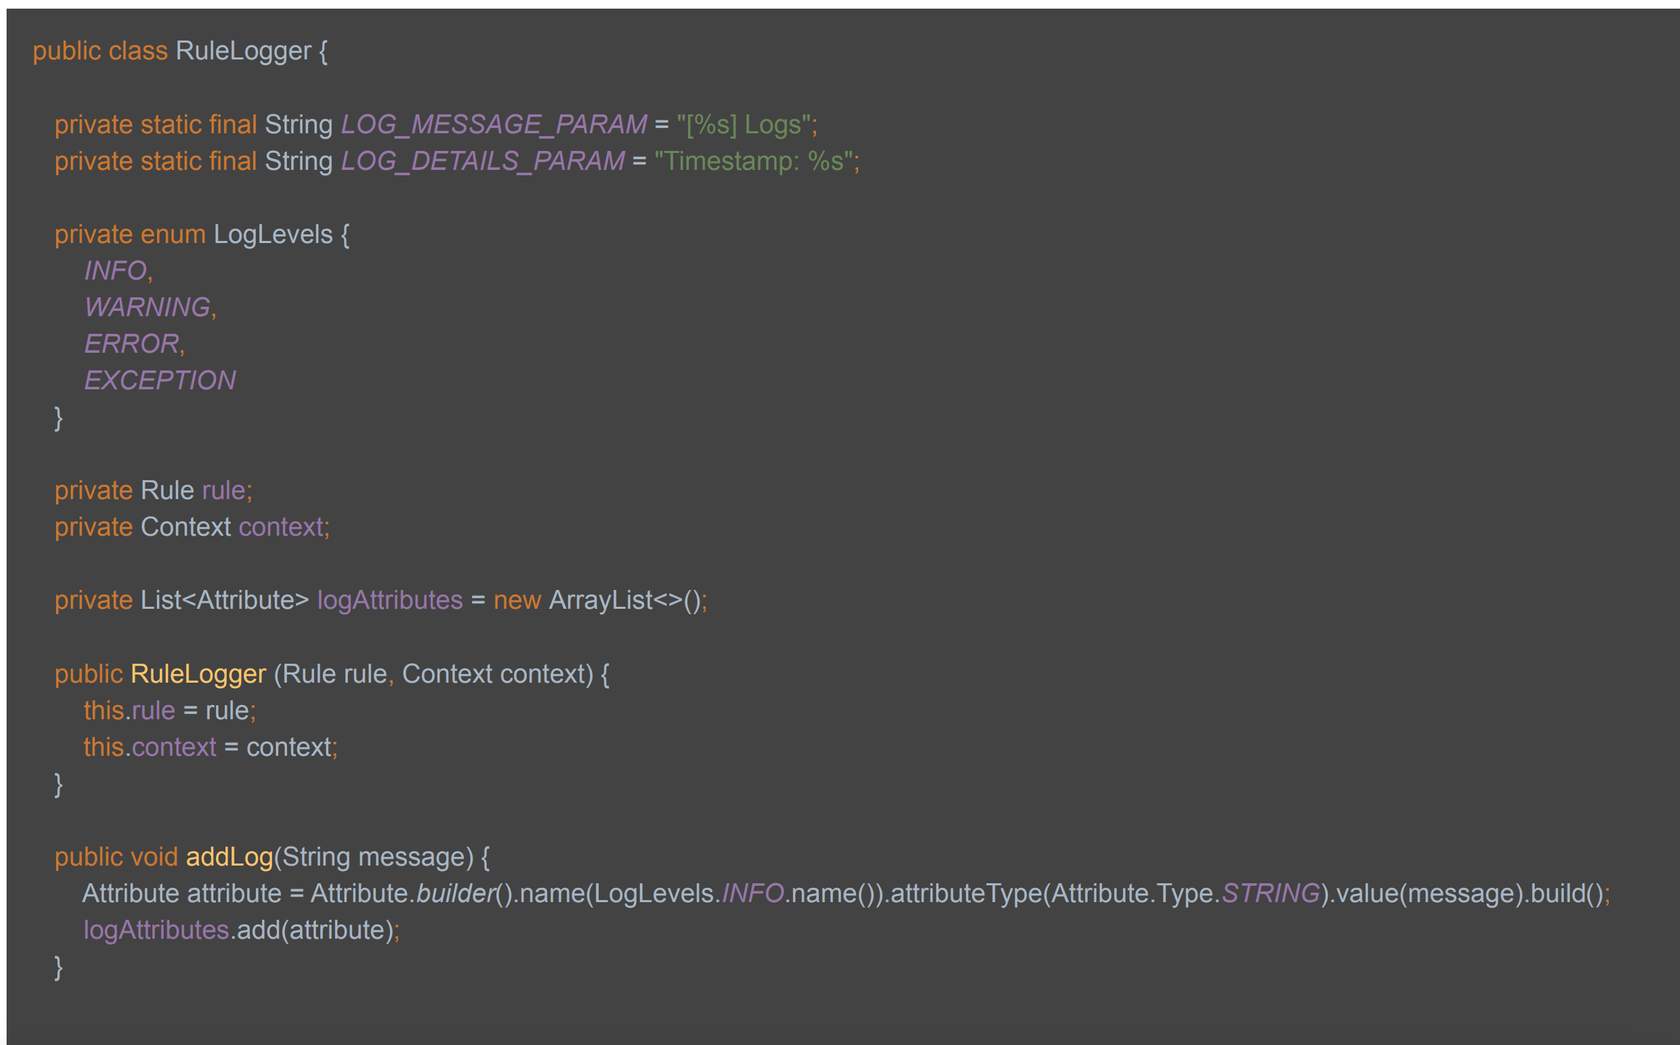
- Custom Log - Create a class for logger. A maximum of 1 log is allowed per rule for performance reasons. This provides accessible information for debugging purposes.
- LogLevels constants - Create an enum representing different Log Levels.
- Create a list for collecting logs - You can collect logs throughout the execution of your class, and write them as attributes to the log.
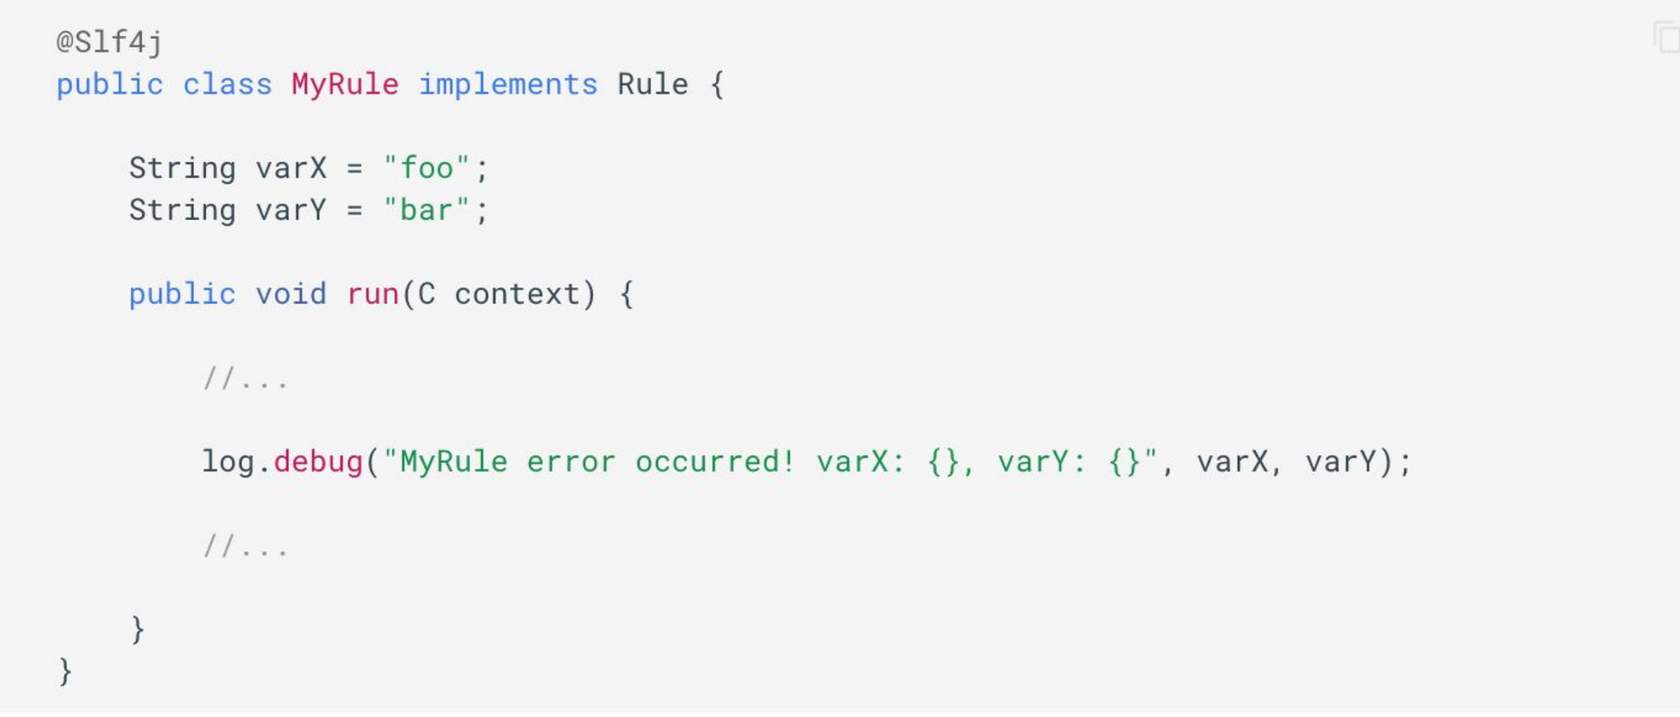
- Logs are internal only - System logs ( log.debug) are internal to our SRE teams. Heavy logs in rule code can impact our support and maintenance procedures, as well as performance.
Test your rule
In this module, you will learn about Unit Testing and creating a Mocked Unit test for a custom Rule. You will also learn how to perform testing on the TestExecutor and finally deploy your plugin into your sandbox environmentUnit Testing
As Rules are atomic in size and complexity. We recommend a Test-Driven Development (TDD) approach. It is an approach where you first write tests, then use those tests to drive the design and development of your software application/rules. The TDD approach is also known as Red, Green, Refactor: ✅ Write a test (Red) ✅ Get the test to pass (Green). ✅ Optimise the design (Refactor)Using this approach, Test cases are written for each Rules' functionality and are executed. In the event of a Test failing (I.e. not passing), a new code is written in order to pass the test by making the code simple and bug-free. This approach results in high-quality code. We recommended that you adopt the following steps when performing testing on the Fluent Platform:- Create a fully Mocked Unit Test (using IDE's Unit Testing capabilities) for your custom Rule. In the Mocked unit test perform one (1) assertion per test case and test both positive and negative paths.
- Test your Rule in the TestExecutor. The TestExecuter can be viewed as a mini Workflow Engine simulator that runs on your local machine to assert additional behavior.
- Deploy your plugin to your Sandbox account.
Mocked Unit Testing
Remember this client?This lesson relates to the Client Scenario — Implement Fraud Check covered in Module 4.We have already created a Rule MarkOrderHighValueRule that implements Fraud Check, as per our client's requirement. In this lesson, we will create a Mocked Unit Test for the MarkOrderHighValueRule class. These tests are Ideal for TDD (Test Driven Development).💡 Follow the steps below to create mocked unit tests for your custom GraphQL Rule
Create a Mocked Unit Test class for your custom Rule
- Open your plugin project in which you have written the MarkOrderHighValueRule class.
- In the src/test/java/com.training/rule folder of your plugin project, create a new class named MarkOrderHighValueRuleTest.
- Write a setup method to initiate the mocks. This setup method will run before every test in the class. The setup method uses MockitoAnnotations class to initiate Mocks(initMocks). Mockito is the Fluent mocking framework.
- Define a mock on Context, which is a required parameter of the run method in the Rule class.
- Make sure you import the v2 version of Context i.e use this package com.fluentretail.rubix.v2.context.Context
- The org.mockito package can mock all classes except final classes.
1
2    package com.training.rule;
3
4    public class MarkOrderHighValueRuleTest
5    {
6
7        private MarkOrderHighValueRule rule = new MarkOrderHighValueRule();
8
9        @Mock
10
11        private Context context;
12
13        @Before
14
15        public void setup()
16        {
17
18            MockitoAnnotations.initMocks(this);
19
20        }
21
22 }Use Mockito to write test cases
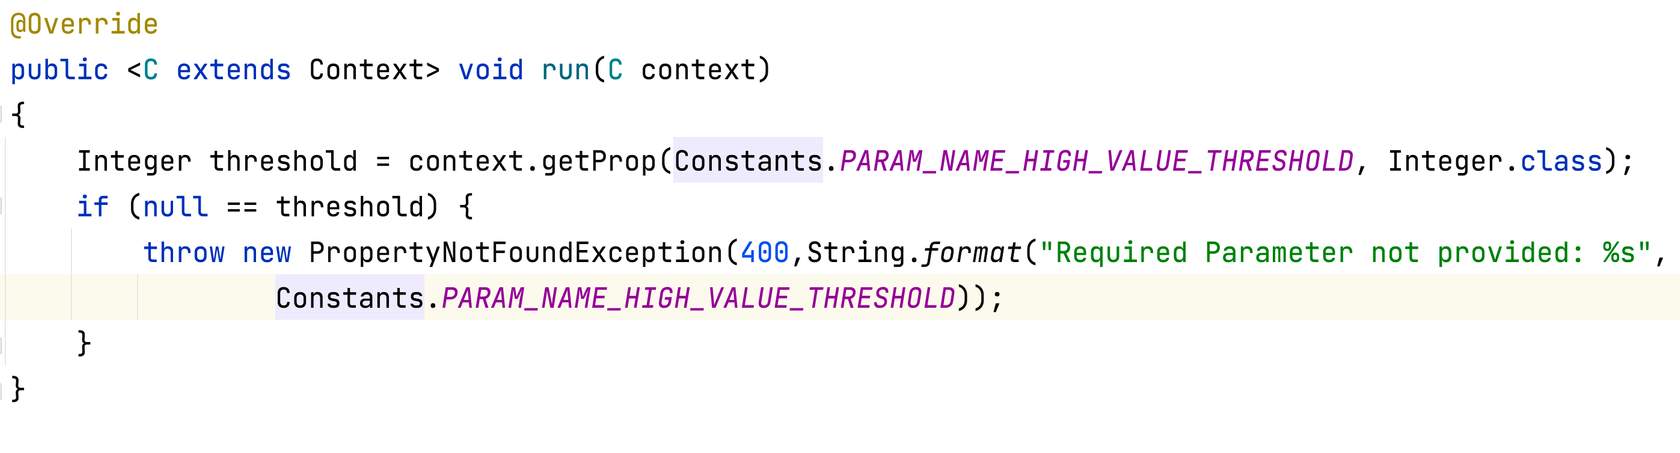
The Test method uses the AAA (Arrange, Act, and Assert) approach, where you arrange the steps, act and then assert.Let's create our first test case. We'll begin by asserting the expected behaviour for parameter validation.The run method of MarkOrderHighValueRule class validates that Rule must have a valid parameter. Given below is the code snippet for validation from MarkOrderHighValueRule class:1/**
2 * NOTE: This is a snippet from `MarkOrderHighValueRule class from 'Writing the Rules' section
3 **/
4
5// Validation:
6Integer threshold = context.getProp(Constants.PARAM_NAME_HIGH_VALUE_THRESHOLD, Integer.class);
7if (null == threshold)
8{
9 throw new PropertyNotFoundException(400,String.format("Required Parameter not provided: %s", Constants.PARAM_NAME_HIGH_VALUE_THRESHOLD));
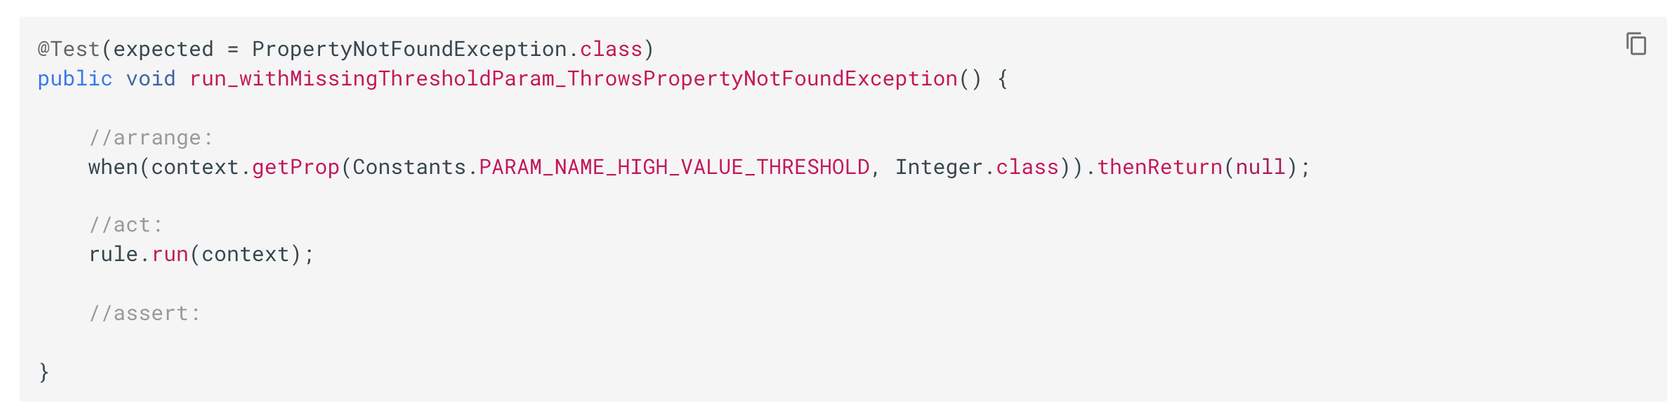
10}- Create a test method named run_withMissingThresholdParam_ThrowsPropertyNotFoundException ( ).
- The run method throws a PropertyNotFoundException, so we don't need any assertion in the Test case. The Test expected behaviour will manage the exception with the following line of code: @Test(expected = PropertyNotFoundException.class)
- Use a negative path test: In the arrange section of the Test, get the property. If the property returned is null, then it throws an exception.
- Run the test case: On IntelliJ use control+shift+R key code. Or, right-click inside the method, and select run_withMissingThresholdParam_ThrowsPropertyNotFoundException method.
👁🗨 Video Demonstrating Steps 1 & 2: Create a Mocked Unit Test / Use Mockito to write test cases
This video illustrates how to:✅ Write a Test case.✅ Import org.mockito package for the Mocking framework.✅ Import com.fluentretail.rubix.v2.context.Context package for Context.✅ Write a Test case to assert expected behaviour for parameter validation.1<dependency>
2 <groupId>org.powermock</groupId>
3 <artifactId>powermock-module-junit4</artifactId>
4 <version>1.6.6</version>
5 <scope>test</scope>
6 </dependency>
7 <dependency>
8 <groupId>org.powermock</groupId>
9 <artifactId>powermock-api-mockito</artifactId>
10 <version>1.6.6</version>
11 <scope>test</scope>
12 </dependency>Include PowerMock and prepare to write the test case
As the Event class is a final class, the org.mockito package can't mock it. We need to make use of PowerMock, it will make the final class use a different test runner and will prepare a class for the test. Perform the steps below to add PowerMock into your plugin project:- Open the pom.xml file in your project.
- Copy the dependencies ( provided below) under the existing Mockito dependency
- Check the scope is set to test
- Clean the Maven project.
- As we are using PowerMock, we need to define a different test runner for PowerMock. Refer to the table below to define and prepare the test runner class for PowerMock
| Annotation | Purpose |
| @RunWith | E.g. @RunWith(PowerMockRunner.class) is used to define a different test runner for PowerMock |
| @PrepareForTest | E.g. @PrepareForTest(Event.class) is used to prepare the runner for the Event class as the Event is the final class |
- Define the following Mocks in your testing class
1// Required Mocks
2@Mock
3private Event event;
4@Mock
5private ReadOnlyFluentApiClient apiClient;
6@Mock
7private GetOrderByIdQuery.Data data;
8@Mock
9private GetOrderByIdQuery.OrderById orderById;
10@Mock
11private ActionFactory actionFactory;- Define/Write the default behaviour of above defined Mocks in the setup ( ) method.
- PARAM_NAME_HIGH_VALUE_THRESHOLD value - returns the default value of $1000
- (context.getEvent()) - it will return the mocked event value
- event.getEntityId()) - will return the default String value of "123"
- Other context values - context.api() , apiClient.query(any(), data.orderById() will return respective mocked values
👁🗨 Video Demonstrating Step 3: Include PowerMock and prepare to write the test case
This video illustrates how to:✅ Add PowerMock to your plugin✅ Define the test runner class and prepare the test class✅ Define the required Mocks and the default behaviour of defined Mocks in the setup() method.Create a test case using PowerMock
Let's begin with a simple test case:"Verify that the Order is updated when the Total Price is above the Threshold"For this test, we will verify that the MutationAction is queued via the Context's ActionFactory (context.action( ).mutate( )), with the GraphQL Mutation Object ( UpdateOrderAttributesMutation) Perform the following steps:
- Create a test method named as run_withValueGreaterThanThreshold_queuesUpdateOrderAttributesMutation()
- The "arrange, act and assert" approach of the test method is explained in the given below interaction (See diagram below).
- Run the test case: On IntelliJ use control+shift+R key code. Or, right-click inside the method, and select run run_withValueGreaterThanThreshold_queuesUpdateOrderAttributesMutation() method.
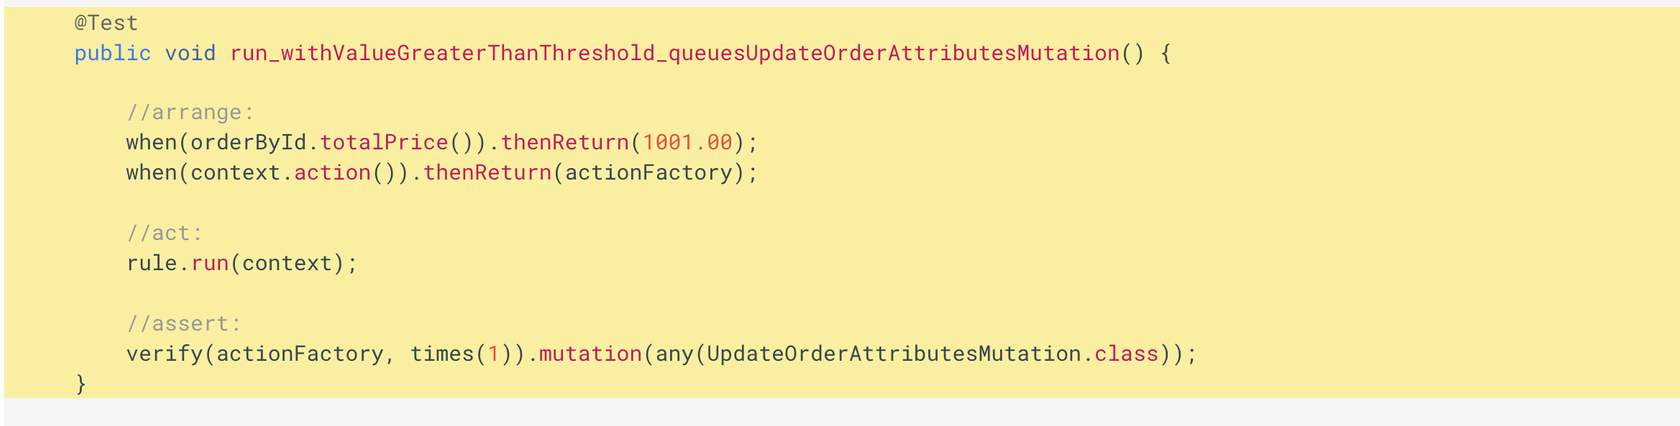
- Arrange - if the order's totalprice value is greater than the default value set in the setup() method then it will return value greater than default value for totalPrice. It also returns mocked actionFactory.
- Act - it will make the rule run on the mocked context.
- Assert - It will verify that the mutation is called only one time and is of any UpdateOrder type.
👁🗨 Video Demonstrating Step 4: Create a Test Case using PowerMock
This video illustrates how to:✅ Write a test case to assert the Order is updated when the Total Price is above the Threshold.✅ Run the test case using PowerMock defined and prepared runner classWrite another test case using PowerMock
Let us assert that "The Attribute is being built correctly."We'll start with verifying the attribute name by mocking the AttributeInput.Builder class. This will allow us to verify that the attribute name is set correctly.Perform the following steps:- Prepare PowerMockRunner by updating @PrepareForTest annotation to include AttributeInput.class . Your annotation should look like:
- Define a Mock of AttributeInput.Builder by using the below code. This will allow us to verify that the Attribute Name is set correctly.
- Create a test method named run_withValueGreaterThanThreshold_addsAttributeWithNameIsHighValue() which throws Exception
- Use the given below code for this test case.
- Run the test case.
1@Test
2    public void run_withValueGreaterThanThreshold_addsAttributeWithNameIsHighValue() throws Exception {
3
4        //arrange:
5        when(orderById.totalPrice()).thenReturn(1001.00);
6        when(context.action()).thenReturn(actionFactory);
7
8        AttributeInput attributeInput = AttributeInput.builder().name("test-name").type("test-type").value("test-value").build();
9        PowerMockito.whenNew(AttributeInput.Builder.class).withNoArguments().thenReturn(mockedAttributeInputBuilder);
10        when(mockedAttributeInputBuilder.name(anyString())).thenReturn(mockedAttributeInputBuilder);
11        when(mockedAttributeInputBuilder.type(anyString())).thenReturn(mockedAttributeInputBuilder);
12        when(mockedAttributeInputBuilder.value(any())).thenReturn(mockedAttributeInputBuilder);
13        when(mockedAttributeInputBuilder.build()).thenReturn(attributeInput);
14
15        //act:
16        rule.run(context);
17
18        //assert:
19        verify(mockedAttributeInputBuilder, times(1)).name(Constants.IS_HIGH_VALUE_ORDER_ATTRIBUTE_NAME);
20 }👁🗨 Video Demonstrating Step 5: Write a Test Case using PowerMock
This Video illustrates how to:✅ Write a test case to assert The Attribute is being built correctlyPractice Exercises
Try writing the following test cases in the same project.- run_withValueGreaterThanThreshold_addsAttributeWithTypeBoolean
- run_withValueGreaterThanThreshold_addsAttributeWithValueTrue
- run_withValueLessThanThreshold_doesNotQueueAnyMutation
- run_withValueLessThanThreshold_doesNotBuildAnyAttribute
- run_withValueEqualThanThreshold_doesNotQueueAnyMutation
- run_withValueEqualThanThreshold_doesNotBuildAnyAttribute
Testing on the TestExecutor
We recommend testing on TestExecutor before you upload your rule into your sandbox account. TestExecutor shows how the rule behaves when running in a local ThreadExecutor. It also asserts some additional behaviour.The TestExecutor allows developers to setup a mock workflow for unit testing of specific rules and simulates the Workflow Framework and provides the following methods:- rule(Class.class): load a rule
- ruleset(RuleSet ruleSet): adds a ruleset to the workflow
- entity(Entity entity): adds an entity to the workflow
- validateWorkflow(Event event): validates the workflow with the given event
- execute(Event event): executes the workflow with the given event
- count*(): Provides access to the number of events or actions that have been executed in the context.
- get*(): Provides access to the entities, rules, events, and properties.
- run_withTotalPriceGreaterThanThreshold_callsMutateAction
- run_withTotalPriceLessThanThreshold_doesNotCallMutateAction
- run_withTotalPriceGreaterThanThreshold_doesNotCallMutateAction
Step 1 - Create a test class
In the src/test/java/com.training/rule folder of your plugin project, create a new class named MarkOrderHighValueRuleExecutorTest .Declare fields, mocks, and setup() method as given in the code snippet below.1public class MarkOrderHighValueRuleExecutorTest {
2
3 private static final Integer HIGH_VALUE_THRESHOLD = 1000;
4 private static final String ORDER_ID = "123";
5
6 private TestExecutor executor;
7
8 private Event event;
9
10 @Mock
11 private ReadOnlyFluentApiClient apiClient;
12
13 @Mock
14 private GetOrderByIdQuery.Data data;
15
16 @Before
17 public void setup() {
18
19 MockitoAnnotations.initMocks(this);
20
21 when(apiClient.query(any())).thenReturn(data);
22 }
23}Step 2 - Create an Event entity
In the setup method, create an instance of a RubixEntity. This is an orchestratable entity inside of Rubix, which is made available to the Rule via the Context.Given below is the code snippet to create an entity1@Before
2 public void setup() {
3
4 MockitoAnnotations.initMocks(this);
5
6 when(apiClient.query(any())).thenReturn(data);
7
8 // Setup up an instance of a Rubix Entity
9 RubixEntity entity = RubixEntity.builder()
10 .status("BOOKED")
11 .entityType("ORDER")
12 .flexType("flexType")
13 .flexVersion(1)
14 .ref(ORDER_ID)
15 .id(UUID.randomUUID().toString())
16 .build();
17
18 }Step 3 - Create an Event to trigger the Ruleset
In the setup method, prepare the Event that will be used to trigger the workflow. Refer to the below interaction, click on + buttons to learn more about the code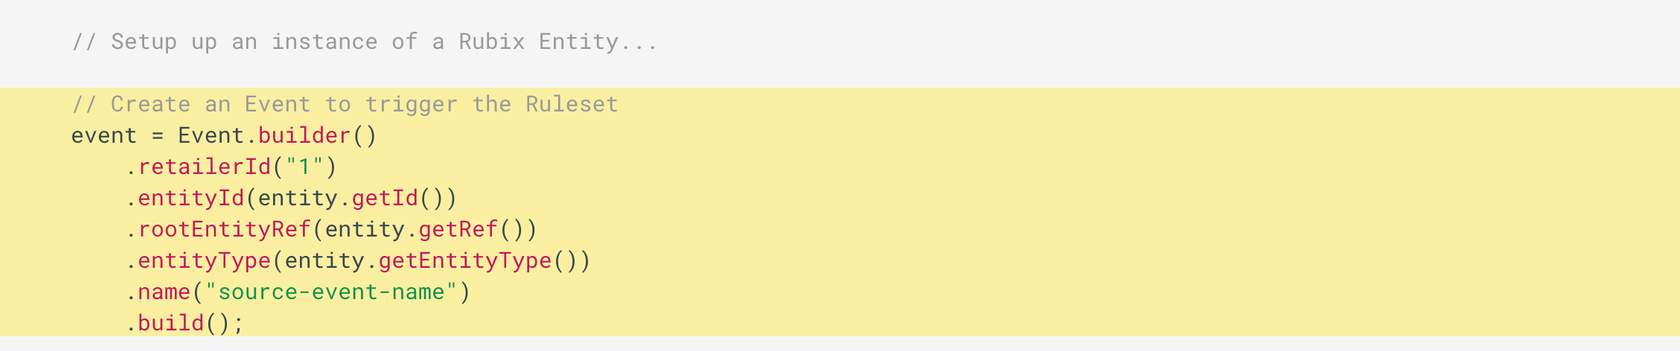
- Event.builder on declared Event instance - Use Event builder to build the event with the attributes of retailerID, entityID, rootEntityRef, etc.
- Event.builder.build - Once the event is built, it will be used to trigger the workflow.
👁🗨 Video Demonstration for Steps 1 - 3
Click the Play Button ▶️ to begin the video. This video illustrates how to:✅ Write a test class✅ Create an Event entity, and an Event to trigger the RulesetStep 4 - Create the Rule instance and Ruleset
We need to provide the following to TestExecutor to execute the test:- The Rule we are going to test.
- Setup the Ruleset- ruleset configured with an instance of the Rule, an Entity, and an Event.
- Create a map in the setup() method to show how the Rule is configured with Rule parameters in the Ruleset.
- Create an instance of a Ruleset in the setup() method to hold an instance of the Rule that is configured with the parameters as shown in the interaction below

- map of rule parameters - ImmutableMap will map required parameters of the Rule.
- event paramater of ruleset - It is the event that is triggering the ruleset.
- name of the rule - MarkOrderHighValueRule.class.getSimpleName() is the name of the Rule class
- map builder - propertyBuilder.build() is the map builder that states how the rule is configured
Step 5 - Setup the TestExecutor
In the setup() method, initialise the TestExecutor to simulate the Workflow Engine using the code snippet below:1// Set up a TestExecutor to simulate Orchestration Engine
2 executor = TestExecutor.builder()
3 .rule(MarkOrderHighValueRule.class)
4 .ruleset(ruleSet)
5 .entity(entity)
6 .testApiClient(apiClient)
7 .build();Step 6 - Create a test case to run on TestExecutor
We have our TestExecutor prepared. Follow the steps to implement the test case.- Create a test method named run_withTotalPriceGreaterThanThreshold_callsMutateAction
- The test method "arrange, act and assert" approach is in the below-given code snippet.
- Run the test case.
1@Test
2    public void run_withTotalPriceGreaterThanThreshold_callsMutateAction() {
3
4        // arrange:
5        GetOrderByIdQuery.OrderById orderById = GetOrderByIdQuery.OrderById.builder().id(ORDER_ID).totalPrice(1001.00).type("type").__typename("type-name").build();
6
7        when(data.orderById()).thenReturn(orderById);
8
9        executor.validateWorkflow(event);
10
11        // act:
12        TestContext context = executor.execute(event);
13
14        // assert:
15        assertEquals(1, context.countActionsOfType(TestContext.MutateAction.class));
16 }👁🗨 Video Demonstration for Steps 4 - 6
This Video illustrates how:✅ Create Rule instance and Ruleset✅ Setup a TestExecutor✅ Write a test case to run on TestExecutorPractice Exercises
Try writing the following test cases in the same project.- run_withTotalPriceLessThanThreshold_doesNotCallMutateAction
- run_withTotalPriceEqualToThreshold_doesNotCallMutateA
Testing on Sandbox
Once you've got good coverage of your Rules in Unit Tests and using the TestExecutor locally, you can deploy your plugin to your sandbox account.Deploy your Rule
In this lesson, you will learn how to deploy and run a custom rule.In the previous module, you tested the Rule which you created for the client. Now, we will deploy the fully tested Rule into the Workflow. The following steps need to be performed to deploy and run your custom rule:- Prepare your plugin for deployment
- Upload and install your plugin on your account
- Add your new rule to a ruleset within a workflow
- Execute your new rule
- Complete your new Workflow
- View the audit events for your rule execution
Step 1 - Prepare your plugin for deployment
Compile & Package
Before a plugin can be deployed to production, it needs to be compiled and packaged by completing the following steps:1. Test - Run all unit tests to ensure your plugin is ready.2. Version - Make sure to prepare the version for your plugin in the pom.xml file and build the project (maven clean package).3. Jar file - Maven clean on the plugin project will produce a Java Library (.jar) file, which can be uploaded and installed onto a sandbox environment (before being deployed to a production environment).Important- A particular plugin version can only be uploaded once.
- Inside pom.xml version tag , SNAPSHOT is possible but can be confusing since “-“ gets replaced with “." which can impact on GET. We recommend replacing SNAPSHOT with version like 0.0.1
- All the test cases need to Pass else the maven built will fail and won't generate .jar file.
👁🗨 Video Demonstrating Step 1: Prepare your plugin for deployment
This video illustrates how to: ✅ Manage the version of your plugin ✅ Generate a jar file for your pluginStep 2 - Upload & Activate
Once you have prepared your plugin for deployment, next you have to upload the plugin into your Postman account. Follow the steps to upload and activate your plugin:Postman & Account Authentication
- Navigate to the DV-RS-01 Deploy a Custom Plugin > Authenticate Account Super User in the Fluent Learning - DV-RS1 Labs Postman collection.
- Select the Fluent Auth request, and click Send. This will authenticate the Super User who has the right to deploy on the account.
Upload Plugin
- Navigate to the DV-RS-01 Deploy a Custom Plugin > Deploy & Validate > Upload plugin and POST the request.
- Set the file parameter in the body of the request by selecting your plugin jar file. On the Body tab, click on Select Files, then browse to locate your plugin jar file.
- Click Send to upload your plugin. Confirm that you receive a successful response, HTTP Status Code 200 OK.
Activate Plugin
- Navigate to Deploy a Custom Plugin > Deploy & Validate > Activate plugin and POST request.
- Click Send and confirm that the response is 200 OK.
Note: This request does not contain a response body. - Inside Deploy & Validate run Plugin Status & Account Rules GET Requests. These requests will give you details of all the active Rules in your account (e.g. event, parameters, event attributes) which are used as the environment variables.
- Use the Get Plugin Status request to confirm that you have successfully uploaded and activated the plugin. The response should contain a field called bundleStatus with a value of ACTIVE.
- Now that your plugin is successfully activated, use the Get Account Rules request to see all the rules active in the account. Search the response for the name of your rule MarkOrderHighValueRule.
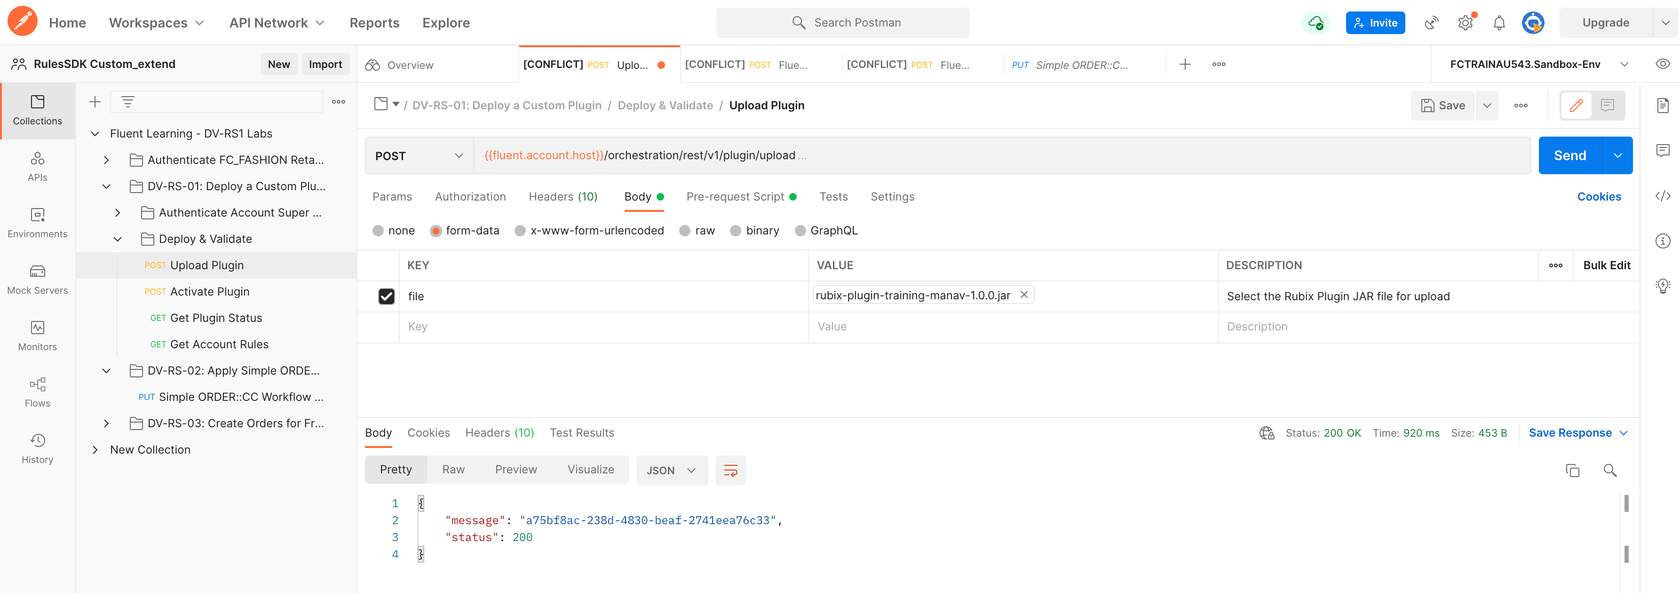
- Upload Plugin - It's a Post request where you will upload your plugin and send the request.
- Plugin Status & Account Rules - These GET request will provide you with your details of your active Rule like parameters, events , event's attributes. These details are used as environment variables.
- Activate Plugin - This Post request Activate your uploaded plugin.
- File - Use File as the Key value.
- Upload's plugin request - Body - You will upload the plugin in the Body of Upload Plugin Request.
- Successful upload - On successful upload you should get status 200 OK response.
- Choose jar file - Browse to location of your plugin project. It is a Jar file which you have created in the Step1 - Prepare your plugin.
- Send request - Once you have uploaded the plugin , Send the request.
👁🗨 Video Demonstrating Step 2: Upload and activate your plugin
This video illustrates how to: ✅ Authenticate on the Postman ✅ Upload and activate your pluginStep 3 - Add your New Rule in the Workflow
- Login to your Fluent Console using your FC_Fashion retailer credentials.
- Authenticate FC_Fashion Retailer in Postman. A successful request will generate a valid access_token and status 200 OK response.
- In Postman, navigate to DV-RS-02 Apply Simple ORDER: CC Workflow and execute the Simple ORDER:: CC Workflow PUT request. A Click and Collect (CC) Workflow will now appear on your Console.
👁🗨 Video Demonstrating Step 3: Add your rule in the workflow
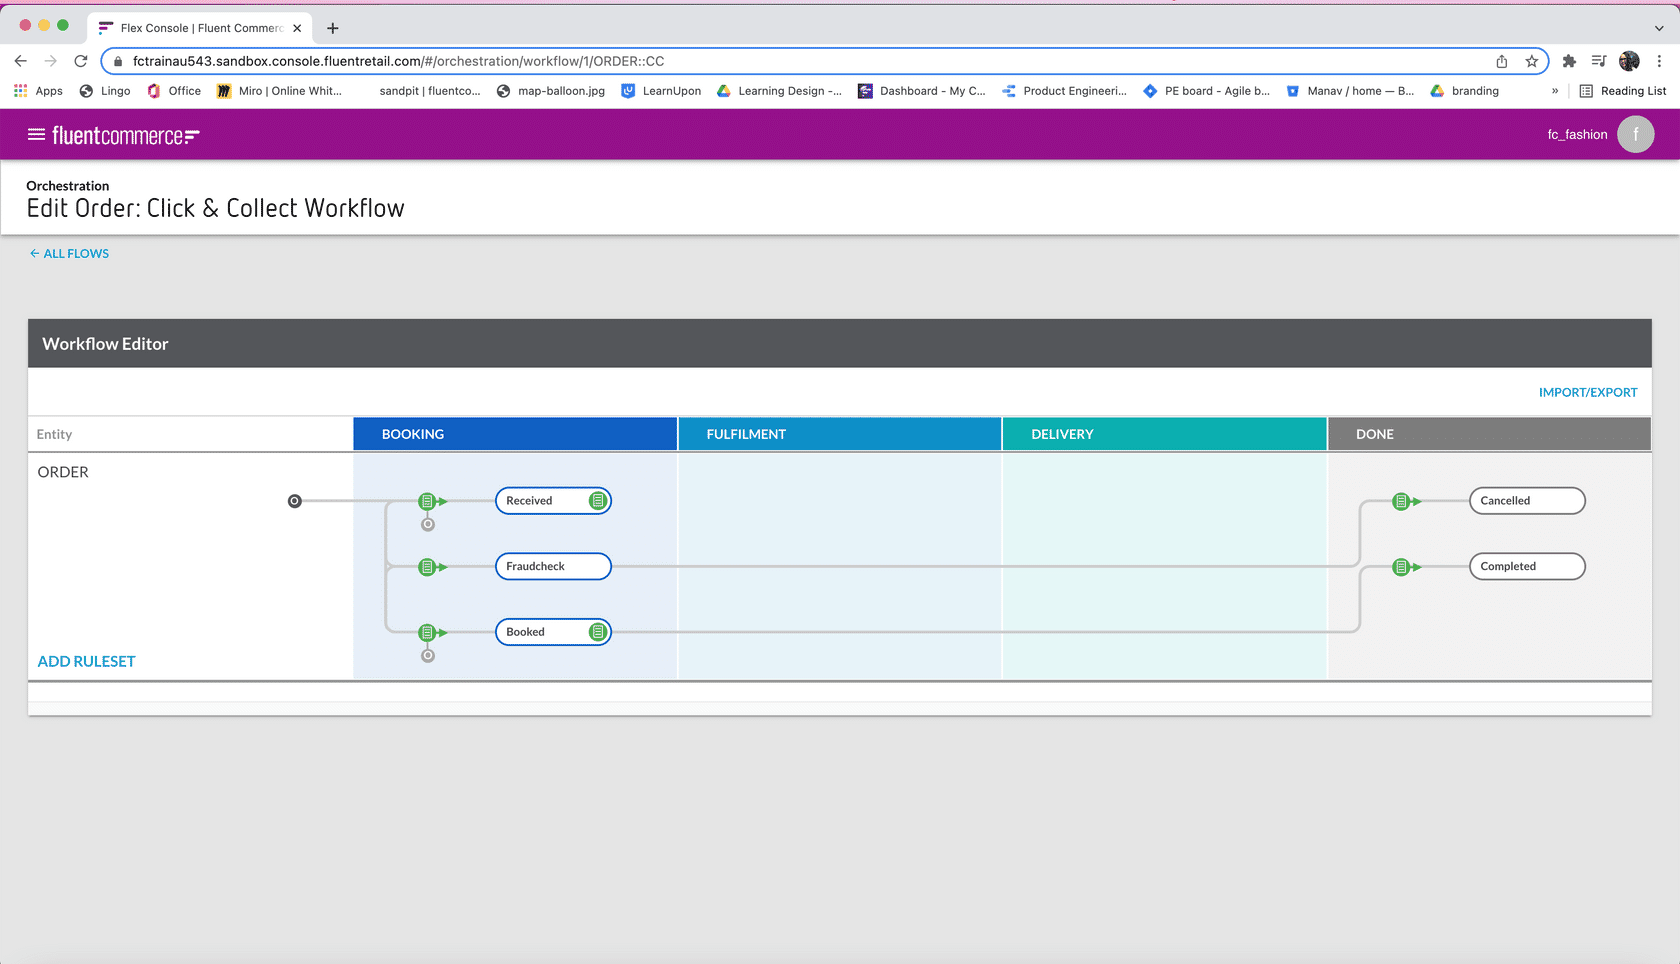
This video illustrates how to:✅ Add your rule in the Workflow- Open the newly updated Order CC Workflow in the Modeller.
- Click ADD RULESET, create a new RULESET and name it AnnotateOrder. *See table below for an e.g. of a short and meaningful description of a Rule.
- Save your RULESET. This will open the RULESET editor drawer that will prompt you for details of the Rule. Refer to the below table to fill in the required details for the Rule:
| Field | Value |
| Description | This can be a short and meaningful description of the Rule E.g Annotate the Order with useful Flags like High value or VIP |
| Available from | List the State when this Rule should be applied E.g. Our Rule MarkOrderHighValueRule should be applied when the Order is in RECEIVED State. |
| Rules | Rules will provide all the active Rules in your account. You can add one or more Rules in a RULESET. E.g. Search and add MarkOrderHighValueRule Rule and set the Threshold to your required number, such as 200 |
- Commit changes.
- Active Rules - This list is displayed when you pick Rules. The list shows all the Active Rules in your Account. You can search and select the Rule.
- Description - Write a short and meaningful description of the Ruleset.
- Available from - Select the state on which the Ruleset will be available. MarkOrderHighValueRule is available when the order is in Received state
- Rules - Add the Rules required for the RULESET. Clicking on Rules will list all the active Rules in your account.
👁🗨 Video Demonstrating Step 3: Add your rule in Workflow Editor
This video illustrates how to:✅ Add a Rule in the Ruleset in the Workflow EditorStep 4 - Execute your new Rule
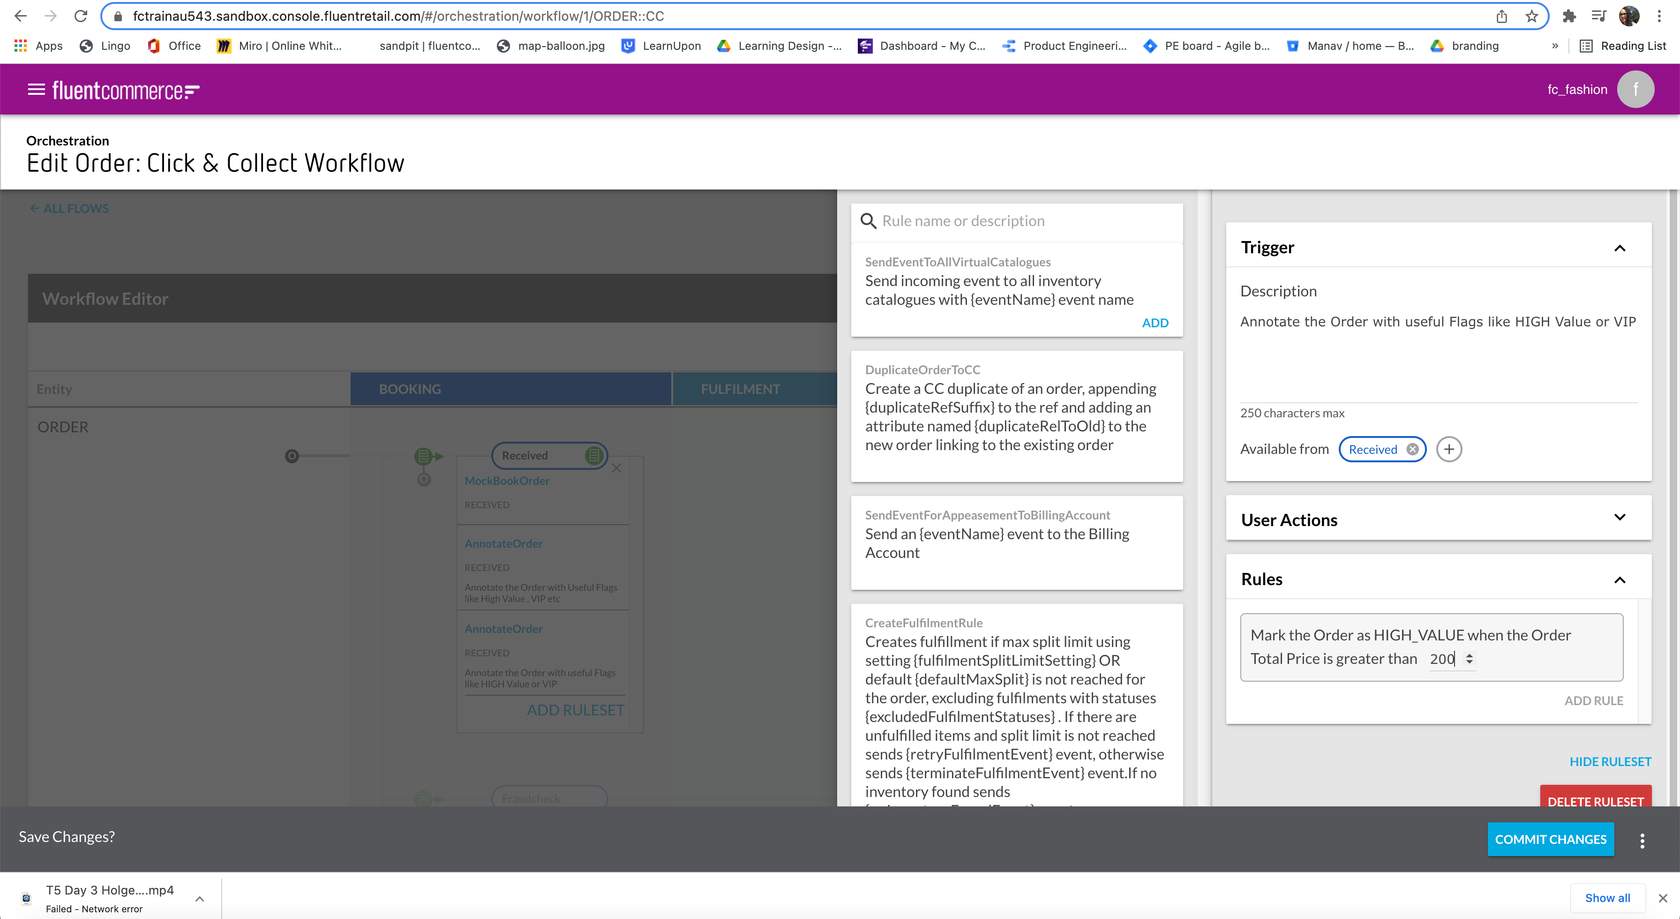
To execute your Rule in the workflow, you need to call the rule from your current Workflow:- Click on CREATE Ruleset and revise the current Workflow by changing the Send a MockBookOrder event for the (current entity) Rule to Send an AnnotateOrder event for the (current entity).
- Create RULESET - Click on Create to modify the current Workflow to call the added Rule
- Send an event for current entity - Call the Rule in "Send an ______event for the current entity.
- An Order with a total price greater than the threshold value
- An Order with a total price less than the threshold value
Order Creation Steps
Using DV-RS-03: Create orders for FraudCheck Logic in Postman, Execute:- Create Customer POST request — this request will create a Customer.
- Create CC Order with Price 105.00 POST request — This request will create an Order with a total Price of 105.00 which is less than the Rule's Threshold value.
- Create CC Order with Price 205.00 POST request — This request will create an Order with a total Price of 105.00 which is greater than the Rule's Threshold value.
- Check if the attribute IS_HIGH_VALUE, has a value of True for the Order with Price 205.00
- Check there should be no Attribute called IS_HIGH_VALUE for the Order with Price 105.00. But the Order should still be progressing through the workflow.
👁🗨 Video Demonstrating Step 4: Execute your Rule
This video illustrates how to:✅ Create customers and orders ✅ Execute the orderStep 5 - Complete the fraud workflow
Execution Context
When an Orchestration Event is received by the Workflow Engine, it initiates the Execution Context. The Execution Context includes the event and the entity specified by the event. The Workflow Engine loads and locates the appropriate workflow for the given event context, based on the entity type and version. To learn more read Understanding Event Execution.Complete the Fraud Workflow
Once we know our MarkOrderHighValueRule works as expected, we can add an end-to-end fraud Workflow, based on high-value orders by the steps below.Add a new RULESET named ValidateOrder with the following:| Required Rules | Rule parameters |
| SendEventWhenEntityAttributeValueEquals |
|
| SendEventWhenEntityAttributeValueEquals |
|
| SendEventWhenEntityAttributeExistsOrNot |
|
- Description of Validate if the Order can be automatically booked or need manual intervention
- Add three (3) Rules to complete the Workflow. Refer to the table below for the details of the Rules required in the RULESET:
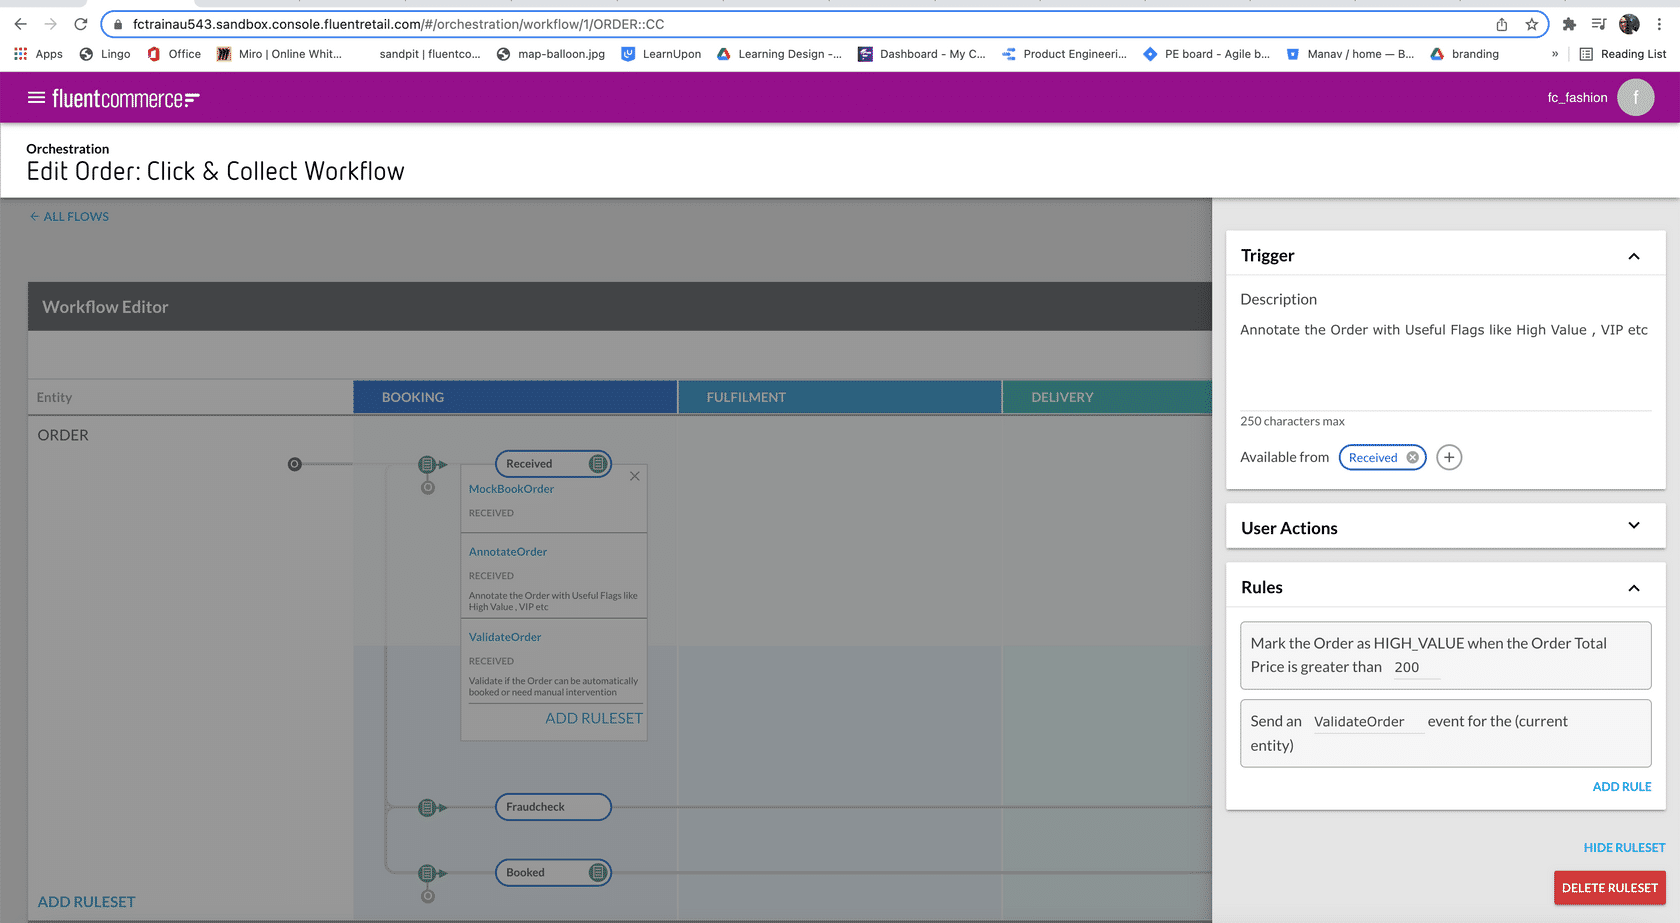
- Mody AnnotateOrder RULESET - Once the ValidateOrder RULESET is created , then modify AnnotateOrder RULESET to add SendEventGQL Rule
- SendEventGQL Rule - In the SendEventGQL Rule , call the ValidateOrder event .
Complete the Modified Workflow
Execute the following using DV-RS-03: Create orders for FraudCheck Logic in Postman:- Create CC Order with Price 105.00 POST request - This request will create an Order with total Price of 105.00 which is less than the Rule's Threshold value.
- Create CC Order with Price 205.00 POST request - This request will create an Order with total Price of 105.00 which is more than the Rule's Threshold value
- On the console, navigate to the Orders section and locate your created Order. The Order with price of 205.00 should be in FraudCheck state and Order with price of 205.00 should be in Completed state . Click on Order to view the order details.
👁🗨 Video Demonstrating Step 5: Complete the fraud workflow
This video illustrates how to:✅ How to complete the Fraud Workflow by creating another Rule and creating a Workflow flow.✅ Create orders to check the complete Fraud WorkflowStep 6 - View the Audit events for your Rule execution
To inspect the details of what happened during the workflow execution, you can inspect the Audit events generated. The following methods can be used to view an Order:- Activity section within Fluent Console — Here, you will see the high-level state lifecycle that the Order went through.
- Fluent Console Events screen —Here, you can search for your Order ID, Reference, or other available filter and view the raw event data associated with the Order.
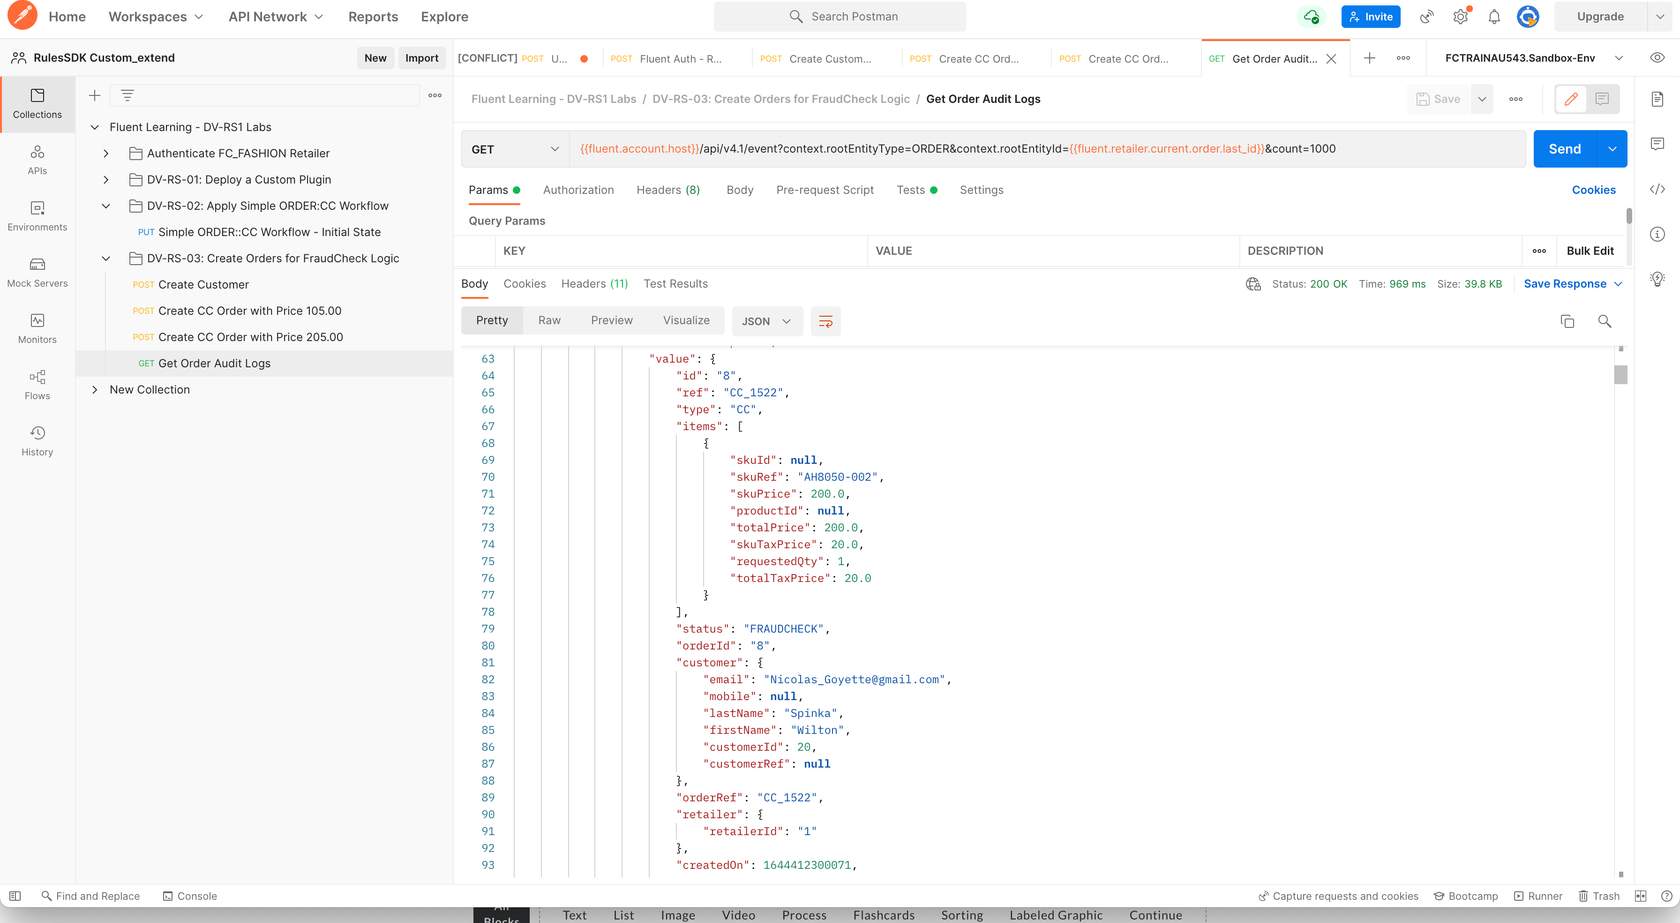
- Postman — Here, you can retrieve all the events associated with the Order in JSON format. You can execute the 'Get Order' Audit Logs GET request in DV-RS-03, create Orders for FraudCheck logic and see the details of all events associated with the Order.