UX Framework (e-learning)
Essential knowledge
Changed on:
8 Nov 2024
Overview
[Warning: empty required content area]Key points
[Warning: empty required content area]Introduction to the Fluent OMX: Configure - UX Framework
Introduction to the OMX UX Framework
A brief introduction to the OMX UX FrameworkHow the UX Framework works
How the OMX UX Framework works
An explanation of how the framework worksStructure of a Fluent Web App
Structure of a Fluent Web App
An overview of the structure of a Fluent Web AppIntroduction to the Component Library
The OMX Component Library is a suite of UI Components, ready to be configured and used in Fluent Web Apps.Unlike a standard UI Component, Fluent Components are built to natively interact with the Fluent Platform.The Library contains a number of different types of Components, including:- Foundation Components, such as Page Components which form the base of a screen
- Content Components for displaying data and media
- Layout Components for structuring pages
- Interaction Components for capturing user input
 Learn more about the Foundation, Content, Layout and Interaction Components:Foundation ComponentsContent ComponentsLayout ComponentsInteraction Components
Additionally, there is a Library of Field Components which are automatically rendered in User Action forms:
- Date Range Field Component
- Multi-Parcel Component
- Pick List Component
- Returns Component
- Retailer Id Component
- Location Id Component
- Extended Address Input
Foundation Components
Foundation Components are a category of components within the OMX Component Library.Foundation Components are top level components that map to a specific URL path within the Web App.Page Components are the primary foundation component, as they layout the page area, and provide a content area for child components to be displayed. Page components are mobile responsive, so the screens render perfectly for any device.Different Page Components are available within the Library, and you can create your own too. For example, you may wish to use a simple, clean page component with minimal header information or a more advanced wizard-style page to help users through a step-by-step process.Learn more about the Foundation Components
Content Components
Content Components are components that display information, including data or media.They can range from simple card components to advanced multimedia or graphical components.
 Content Components typically display data from the configured Page query, but some may display information retrieved via a component specific API call.Content Components are typically added as descendants to Page components to form screens.Learn more about the Content Components
Layout Components
Layout Components provide additional structural elements to the screen.For example, you may wish to layout your page into multiple sections, each with a header and actions.
 Or, you may want to display tabs which show different components or data based on which is active.
 Another example is to conditionally display components, based on an entity type for example.Like Foundation Components, Layout Components have descendants, which identify what should be displayed for that layout.Learn more about the Layout Components
Interaction Components
Interaction Components allow users to interact with the OMS.Interaction Components could be a form to capture information, or a button to execute an action.
 These are not to be confused with the standard user actions, which display buttons in the page header, and slide out a right hand drawer for form display.Rather, these components can be added directly to a screen just like any other component.Learn more about the Interaction Components
Field Components
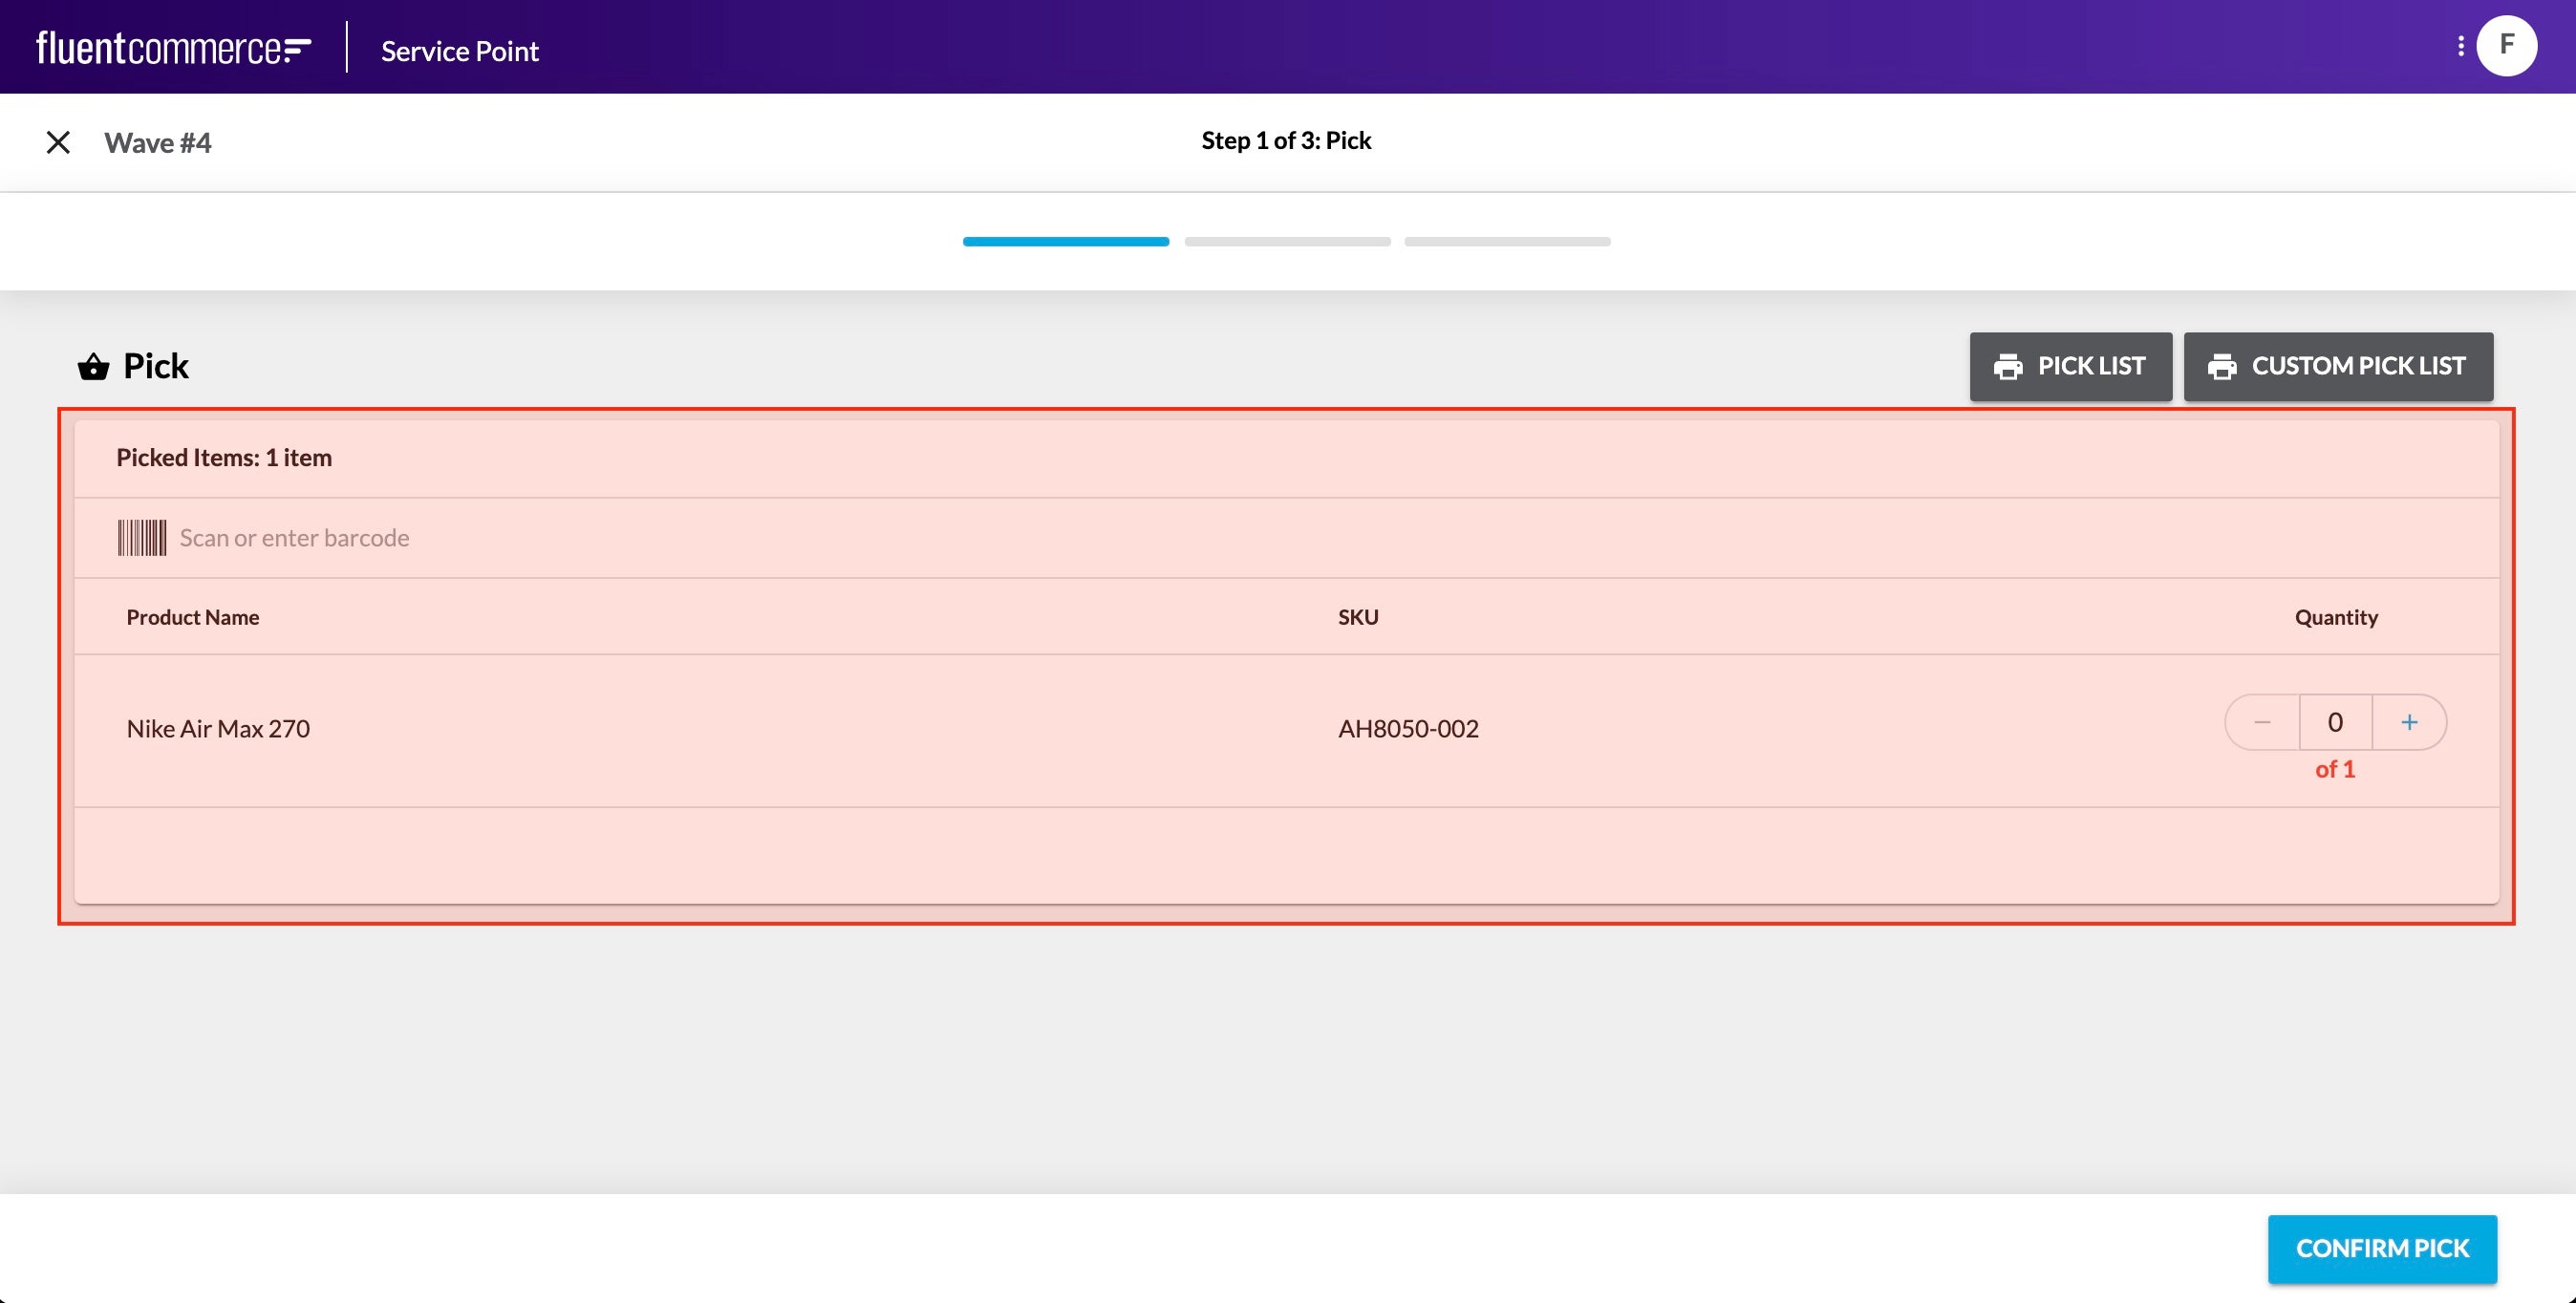
Field Components are a different kind of component all together.They cannot be configured via the manifest. Rather, they are automatically rendered based on the data type to be captured.Field Components are essentially form based elements. They could be as simple as a text box, or more advanced with multiple input fields and types.Field Components are key in delivering flexibility and enhanced user experience to complex user actions driven by the workflow. Workflows can require complex data input for the expected trigger event, and Field components enable full control over the user experience provided for those cases.
 For example, in the screenshot above, the Requested Quantity and the Location selection are 2 parts to a single field, which map to an Event Attribute structured as follows:
`{`` "name": "StockReserveDetails",`` "value": {`` "locationRef": "F_NSYD",`` "requestedQuantity": 2`` },`` "type": "STOCK_RESERVE_DETAILS"``}`Since Field Components are rendered automatically based on the User Action definition, there is no configuration reference required.Learn more about the Field Components
- Date Range Field Component
- Multi-Parcel Component
- Pick List Component
- Returns Component
- Retailer Id Component
- Location Id Component
- Extended Address Input
Download the VS Code Workspace for configuring Manifests
We've provided a VS Code Workspace project, which comes preconfigured with the Manifest Schemas to enable Auto-Complete in VS Code.Simply download the attached Zip file, extract it on your computer, and open the workspace file in VS Code.Once complete, type "Done" into the "Your Response/Notes" form, select "Movyn John OR Randy Chan" as your instructor, and then click "Submit Assignment".Please Note:Before you can start following the online course practically, you will need your Fluent Account credentials.
If you have not yet received your credentials, please type "Waiting for Credentials" into the response form, or email learning@fluentcommerce.com to request them.
Please allow up to 48 hours to receive the email with details.Please download the zip here.
Introduction to the Manifest Document
The Manifest document describes the structure and layout of a Fluent Web App, including the navigation, and all pages within the application.The manifest document is added as an ACCOUNT level setting.The name defined in the manifest determines the URL path required to access the Fluent Web App.For example, a manifest declaring a name or "mywebapp" would be accessible via the following URL:
`https://[ACCOUNTID].sandbox.apps.fluentcommerce.com/mywebapp/`The manifest also determines the context of the Web App, either "retailer" or "location", and delivers Role based visibility management, so that each Web App and screen can be configured based on each client's unique organisational structure.The manifest also defines the data to be provided to the page via GraphQL queries.Watch the video below to see a simple new manifest document structure...
Creating a new manifest
How to create a new manifest document`fc.mystique.manifest.[appName]`...where [appName] is the name of the web app. The Setting should be a JSON type, and store the manifest document in the JSON value. To access the web app, you would use the following URL:`https://[ACCOUNTID].sandbox.apps.fluentcommerce.com/[appName]/`Each Fluent Web App should a define Name, a Title, a Context, and a set of Routes.The Context is the scope of interaction with the Fluent Order Management system.For example, the Fluent Store Web App is set to a Location Context, since all the actions and data present within the Web App are specific to an individual Store.A Retailer Context Web App would provide Retailer scoped actions and data management.Routes are the URL paths that point to Pages or screens.There are 3 types of Routes that can be configured in a Manifest:- A Page Route - which is a direct link to a page
- A Section Route - which is a navigation grouping header
- A Reference Route - which is a reference to another manifest document called a fragment, which allows you to split and manage large manifests in separate documents
`fc_fashion_admin`Setting up the manifest document
This video shows how to set up the manifest document`location`` context in the manifest, use a Location user login, such as `F_syd@fcfashion.com.au`, to log in and view the empty app.Note: Don't worry about the "error" text displayed - we'll fix this next!Let's add a simple Page route to the Manifest:A Page Route should be set to type "page", declare a relative URL path, use a foundation or page based component, and optionally a nav configuration for the main menu.Once you have your first page, you can now set your web app's home path.
Let's see it in action...
How to add a blank page
This video shows how to add a blank pageTop Level Manifest Structure
There are 2 types of manifest document format. The primary type is the main web application manifest, and the second type is a fragment which can be referenced from the main Manifest document.The main manifest document structure is as follows:
`{`` "manifestVersion": "2.0",`` "name": "store",`` "title": "Fluent Store",`` "context": {`` "level": "location"`` },`` "routes": MystiqueRoute[]``}`The required fields include:
- manifestVersion
- name
- title
- context
- routes
 The primary Route type is a page route. This defines a specific page to display when the user clicks on the navigation item.
 Finally, there are Reference routes, which provide manifest fragmentation capability, so that you do not need to manage the whole UI configuration in a single (and very large) JSON document.
`{`` "type": "reference",`` "settingName": "fc.mystique.manifest.servicepoint.fragment.pickandpack"``}`The structure of a fragment Manifest is as follows:`{`` "manifestVersion": "2.0",`` "routes": MystiqueRoutes[]``}`Finally, the Manifest document can also be configured to read custom plugins containing custom components referenced within the Manifest.`"plugins": [{`` "name": "Example",`` "src": "https://example.com/bundle.js"``}]`For more information, and to learn how to configure each part of the Manifest document, see the Configuration Guide.Creating a new Manifest Fragment
Let's imagine our client would like to see all the Storage Areas available within a Store.We can easily add this capability to the Fluent Store Web App code free!First, watch the video below to see how to create a new Manifest Fragment document...
Create storage areas fragment
This video shows how to create a storage areas fragmentThe main Fluent Store Manifest Document is already added to your Training Account. See the following Account Setting:
`fc.mystique.manifest.store`If you do not have this setting, or you would like to update it, download the main store manifest.The Fluent Store URL: `https://[ACCOUNTID].sandbox.apps.fluentcommerce.com/store/`Note: Replace "`[ACCOUNTID]`" with your assigned Training Account, e.g.: `FCTRAINAU001`Log in to the Store app using the F_SYD Location User:
Username:
`F_syd@fcfashion.com.au`Password:
`1234`Watch the video below to see how it's done...How to add storage areas fragment to store
This video explains how to add storage areas fragment to storeAdd a Component to a Page
We now need to display all the Storage Areas associated to this Store.To do this, we'll use the standard List Component provided by the Component Library.First, let's add the component to our page...
Storage areas fragment list
This video explains storage areas fragment listsFor more information and configuration options, see the List Component documentation.
Configure a Data Source for your Page
In order to show data in the Storage Areas List, we need to configure a data source.Components on a page can reference a data source from a query defined on the Page Component.First, we'll configure a page query, to retrieve the currently active Location's associated Storage Areas.The
`data` object on the Page Route takes a `query` and a `variables` object for defining a GraphQL Query.`"data": {``"query": "query locationStorageAreas ($locationRef: String!) { location (ref: $locationRef) { id ref storageAreas { edges { node { id name status type } } } } }",``"variables": {``"locationRef": "{{activeLocation.ref}}"``}``}`You'll notice the use of a special variable called `{{activeLocation.ref}}` above. Since this Web App Context is "location", you can access the currently active context using the `activeLocation` object. This provides access to the Location Id, Ref, and Primary Address.Once the Page query is defined, go to the Component configuration, and add a `dataSource` field. The `dataSource` for the list should be set to the `storageAreas` connection on the `location` query path: `location.storageAreas` `"dataSource": "location.storageAreas"`With the data source configured, all that's left is to update the fields to be displayed in the list with dynamic values. We'll display the Name, Type, and Status from the Storage Area.This is done by specifying the field of each node in the Storage Areas connection: `{{node.name}}` `"attributes": [``{``"label": "Name",``"value": "{{node.name}}"``},``{``"label": "Type",``"value": "{{node.type}}"``},``{``"label": "Status",``"value": "{{node.status}}"``}``]`See this in action in the video below...Configure a data source
This video shows how to configure a data sourceLearn more about Dynamic Attributes on this page.
Adding a Details Page
In this lesson, we'll show you how to create a details page for a specific item in a list, and hyperlink the list to the detail page.Add a details page
This video shows how to add a details pageConfigure the components on the page
Next we'll configure our Details page with a page query, similarly to the listing page.For the details page, we'll query the storageAreaById query, and retrieve the associated articles connection.Watch below to see this in action...
Configuring components Part 1
This video shows how to configure componentsConfiguring components Part 2
This video shows how to configure componentsWorking with Dynamic Values
The Framework provides some useful features for working with dynamic data.First, let's consider the Date and Time based data. The Framework provides a useful dateStringFormatter to help format the raw date values in more readable forms.Take a look at the follow video to see this in action.
Working with variables - date formatting
This video explains how to format the date in variablesThere are also some useful features for working with arrays. Typically you can access an array item by its index as follows:
`node.attributes.0.value`This works on edges too: `node.aticles.edges.0.node.ref`Now, you can retrieve Attributes by Name:
`node.attributes.byName.Size`In our example, the Article associated to the Storage Area contains an attribute named "FulfilmentType". See how we can show this in the Articles list below.Working with variables - attributes by name
This video shows how to with with attribute names when working with variables`{`` "type" : "image",`` "value" : "{{attributes.byName.imageUrl}}",`` "options" : {`` "width" : 220`` }``} `Read more about configuring Dynamic Attributes on this page.